Converting Phono Inputs to Line-Level
Contents:
Overview
Toshiba SA-320
Kenwood KR-A46
Nikko STA-5010
Overview
Now that turntables have preamplifiers built in – or have been replaced by CD players,
iPods, and so forth – we don't need a phono input on our amplifiers.
An additional line-level input would be welcome instead.
One way to solve the problem is to attenuate the line-level signal to phono level,
meanwhile undoing the RIAA equalization, using
Tomi Engdahl's handy circuit
(caution: obnoxious pop-up ads which Opera does not block).
Build two for stereo.
Or you can buy essentially the same device ready made
(as a "line level to RIAA phono attenuator") from
MCM Electronics.
Engdahl's circuit is completely outside the amplifier and does not require modifying it.
But you still get whatever noise is introduced by the phono preamp inside the big amplifier.
Also, the signal can't possibly sound as good after going through two equalizing networks,
anti-RIAA and then RIAA, as it would if it went through neither one.
It's better to bypass the phono preamplifier circuitry altogether.
This requires some thought.
Basically you have to get a circuit diagram of your amplifier, then modify it to
make the phono input just like the aux input.
Here are three specific procedures for doing so, based on my own experience.
After doing a conversion, don't forget to document your work by adding a small label
to the back of the amplifier:

Note: This information is provided "as is." I cannot take
responsibility for your results.
For a consulting fee, if provided with a circuit diagram, I can suggest
conversion procedures for other amplifiers, but it is probably better to look for
a local technician who can both design and carry out the conversion.
Toshiba SA-320

The phono preamplifier is on a separate circuit board.
Simply locate the cable coming into it (from the phono jacks) and
the cable going out. Unsolder them from the board and splice them
together carefully.
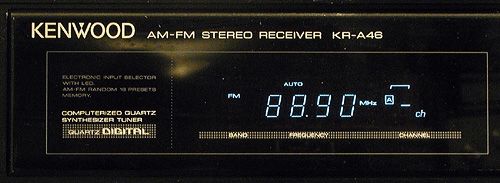
Kenwood KR-A46
This is more complicated. The service manual and schematic
are available from Kenwood.
The exact procedure that I came up with is the following:
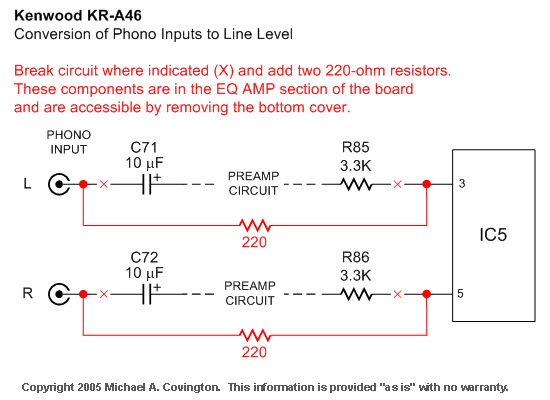
To break the circuit, I simply removed C71, C72, R85, and R86.
Then, to keep them away from the unused preamp circuitry,
I mounted the new resistors on the underside of the circuit board:
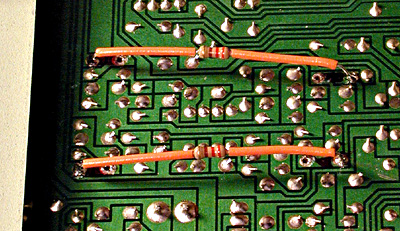
Here they are insulated with insulation taken from a piece of #22 wire.
While you're at it, clean the balance, treble, and bass controls with a shot of
Caig Moving Contact Lubricant. To get to them, just pull off the knobs.
Nikko STA-5010
This one is substantially more complicated.
Since the circuit diagrams are not widely available,
I have posted them
here
and
here.
After working out the conversion, I decided not to go through with it
for two reasons.
First, the condition of my 33-year-old receiver doesn't warrant it.
There's beginning to be enough deterioration of metal contacts that in a few
years it will start giving trouble.
I'm reclassifying it as an antique, to be kept alive as long as possible
but not used to make important recordings.
Second, there's no way to avoid running the signal through the Nikko's preamp;
oddly, the Nikko runs everything through the preamp, attenuating
the aux, tuner, and tape signals first.
Also, in spite of its size, this receiver is not easy to work on, with many
parts mounted very close together, and wiring on both sides of the circuit boards.
Nonetheless, here's what I came up with:
Copyright 2005, 2006 Michael A. Covington. Caching in search engines is explicitly permitted.
Please link to this page rather than reproducing copies of it.
This page is not in any way connected with or endorsed by any
manufacturer or vendor. Many of the product names that appear
on this and related pages are registered trademarks of their respective owners.