 |
|
Covington Innovations Home > Astronomy and Astrophotography > Links > Digital SLR Notes > Cable Release for Canon Digital Rebel


Building a Cable Release and Serial-Port Cable
for Canon Digital Rebel Cameras
Note: Although simple, these are not projects for total beginners. Do not proceed unless you understand the diagrams, are familiar with all the components, and know how to use an ohmmeter to verify your connections, unless you can get help from a knowledgable person locally. I've had several inquiries from people who have never wired a switch before. Reluctantly, I have to say that your $1000 camera is probably not the best place to start. Normally, there should be no way to damage the camera by shorting together any of the cable release connections, but long experience has taught me that complete beginners will make mistakes that I cannot foresee. It is almost impossible for me to give help by e-mail – I can't see your wiring.
If your camera is an EOS 40D, please click here.
Cable Release
In what follows I am greatly indebted to more detailed plans published by Chantal Currid. See that site if you need detailed how-to-build-it instructions.The EOS Digital Rebel cameras (EOS 300D, 350D, 400D) do not take a standard camera-type cable release. Instead, Canon makes a cable that plugs into the side of it. This cable has a 3/32-inch (2.5-mm) stereo phone plug (like the plug on a pair of Walkman headphones, but one size smaller). Such plugs are available at Radio Shack for about $3 each.
You may be able to save money by finding some other device with such a plug on it. Reportedly, some Motorola (not Nokia) cell phone hands-free kits have the right connector and will, in fact, work as a Canon cable release with modification just use the mute button or mute switch! I have not tried this. It will not damage the camera because it does not contain a source of power.
A suitable, very flexible three-wire cable can be salvaged from defunct Walkman-type headphones. It does not have the right kind of plug on it.
To make your own cable release, all you have to do is connect two switches, one from tip to sleeve and one from ring to sleeve:
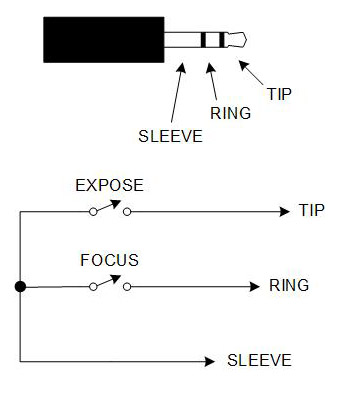
Closing the "focus" switch is like pressing the camera's button halfway, and closing the "expose" switch is like pressing it all the way.
You do not have to include the "focus" switch, since when you press "expose," the camera will autofocus if it has not already done so, and then take the picture.
For most purposes you want momentary-contact pushbuttons, but for time exposures on "bulb," you want a toggle switch for "expose." One handy arrangement is to use a small button for "focus," and a bigger button with a toggle switch in parallel with it for "expose."
Since I built mine purely for astrophotography, I chose to include only a toggle switch for "expose," and no "focus" button.
(Note: The EOS 40D and some film Rebel cameras do not work properly if you only close one of the two switches. See my notes on the EOS 40D for how to deal with that situation.)
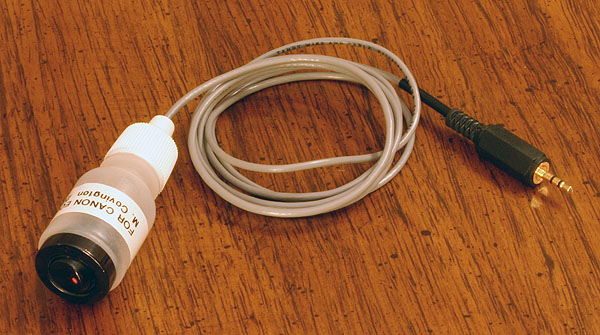
I used a switch from my junk box, housed in an eyedrops bottle.
Below is an equivalent circuit of what's inside the camera. Each switch carries about 0.5 mA at 3.3 volts. Obviously, you can use optocouplers, switching transistors, or relays in place of the switches in order to control your camera electronically.

Serial-Port Cable
If your camera is an EOS 400D (Digital Rebel XTi), and possibly even if it isn't, you may want to read these notes by Mikhail Konnik in Russia, giving an alternate circuit that he found necessary. I have not had the same problem; it may be a matter of Canon firmware versions or something.
The EOS Digital Rebel can be controlled through its USB port using Canon Remote Capture software (included with the camera) and various other packages.
However, the USB port does not provide a way to open and close the shutter on "bulb."
Accordingly, if you want to make long exposures under computer control, you'll need a serial-port or parallel-port cable release such as I am about to describe. Other designs are given on the web site of DSLR Focus, which is a software package for DSLR astrophotography.
The idea is to use the DTR line of your serial port to actuate the camera. DTR is high (about +6V) whenever the serial port is open for communication, and low (-6V) at all other times.
The traditional circuit looks like this:
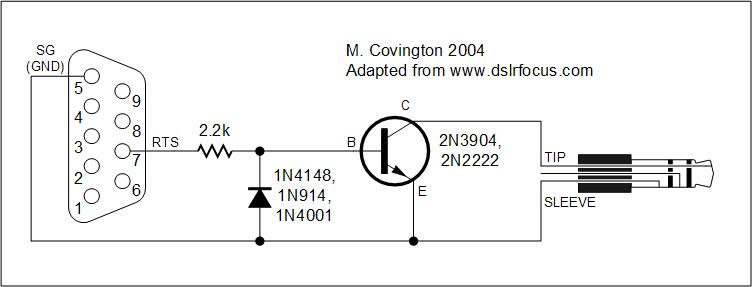
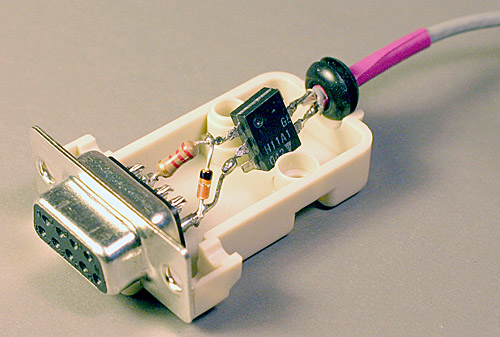
It can be made with Radio Shack parts but does not isolate the grounds of the camera and the computer. Isolation is desirable if the camera is powered from the AC adapter rather than its own battery. Accordingly, I designed and built an optoisolated version:
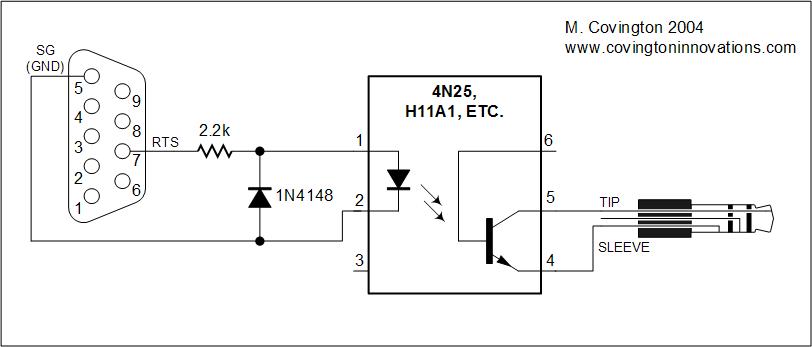
It's built into the plug like this:
Note that the pins on the 9-pin serial port connector are labeled:
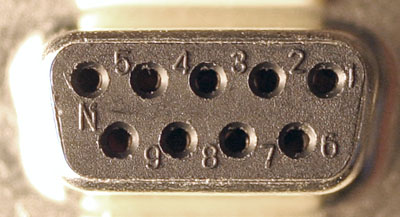
Always follow the numbers on the label rather than any diagram.
Finally, there's the question of software. You will almost certainly want to use a general-purpose camera-control program, but if you don't have one, here are a couple of sample programs to demonstrate that the serial port works. Here's one in QBASIC:
'File EOSdemo.bas
' Simple QBASIC program to take a 45-second
' exposure on "bulb" using serial port cable.
'
PORT$ = "COM1"
CLS
OPEN PORT$ + ":300,n,8,1,cd0,cs0,op0" FOR RANDOM AS #1
PRINT "Exposing..."
SLEEP 45
CLOSE #1
PRINT "Shutter closed."
QBASIC, the descendant of Microsoft GW-BASIC, is free with Windows but not normally installed. You can download it from: ftp://ftp.microsoft.com/Products/Windows/Windows95/CDRomExtras/OtherUtilities/olddos.exe (as part of a package called olddos.exe) or Google for "download qbasic".And here's VBSCRIPT. The VBSCRIPT interpreter is built into Windows. To run the program, save it in a file named EOSdemo.vbs and simply click and "open" it.
'File EOSdemo.vbs
' Simple VBSCRIPT program to take a 45-second
' exposure on "bulb" using serial port cable.
'
PORT = "COM1"
MsgBox "Ready to start exposure"
Set fso = CreateObject("Scripting.FileSystemObject")
Set com = fso.OpenTextFile("COM1")
Wscript.Sleep 45000
com.Close()
MsgBox "Shutter closed."
Copyright 2004, 2007 Michael A. Covington. Caching in search engines is explicitly permitted. Please link to this page rather than reproducing copies of it. This page is not in any way connected with or endorsed by any photographic manufacturer. Many of the product names that appear on this page are registered trademarks of their respective owners.