2019
February
26
|
Now they're making wood out of plastic...?
Interesting workshop material of the day:
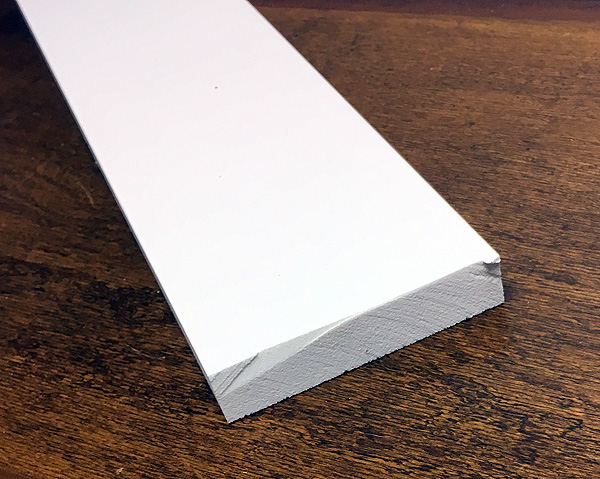
PVC trim boards now available at the local Home Depot.
They are made of white plastic with a cellular structure (like very dense foam,
but smooth-surfaced) and can be cut and drilled with ordinary carpentry tools;
the texture is a lot like poplar. More technical information here.
We mounted a board of this material on the wall of Sharon's room so she can attach hooks, decorations,
etc., without either damaging the sheetrock or relying on it for strength.
Compared to wood, this material is not as strong (not designed for heavy loads) but still much stronger
than foamcore or sheetrock. It is white all the way through; you don't have to finish the edges. It can be
painted but need not be. What you see above, on the end, are marks from a circular saw; when cut with a table
saw, this material gives a very smooth edge and can of course be sanded. It is waterproof and weather-resistant.
I'm intrigued by the possibilities for using it for much smaller things in the workshop, such as bases
or enclosures for electronic prototypes, small jigs and tools, toys, and the like.
Home Depot sells it in 8-foot lengths and won't cut the boards on their panel saw because "it gums up the blade."
When I used my own saws on it, I did brush away the particles clinging to the blade, and if the blade were
hot from heavy use, I suppose there might be some melting. At Home Depot they do let you cut the boards with the
hand saw in their molding department.
Permanent link to this entry
Pop-up file dialogs in a Python console program
Most Python programs are small and simple and run on the console (at a command prompt or the
equivalent). But even in such a program, it's handy to let the user pick file names using standard
GUI file dialog boxes. It turns out that's easy to achieve. Just do this:
#!/usr/bin/env python3

import tkinter as tk
from tkinter import filedialog
root = tk.Tk()
root.withdraw()   # hide the main window

infn = filedialog.askopenfilename(
	title = "File to read",
	filetypes = (("Text files","*.txt"),("all files","*.*")))

outfn = filedialog.asksaveasfilename(
	title = "File to write",
	filetypes = (("Text files","*.txt"),("all files","*.*")))

print("Input file:  ", infn)
print("Output file: ", outfn)

with open(outfn, mode='w') as outfile:
    with open(infn) as infile:
          # Do something that reads infile and writes outfile

input("\nDone. Press Enter...")
The first four lines access Tcl/Tk, bring in the file dialogs, and close the main window, which is
not used. If the user clicks "Cancel" in a file dialog, the file name comes back as an empty string.
Permanent link to this entry


|
2019
February
25
|
Orange County roller bearing upgrade to Celestron AVX mount
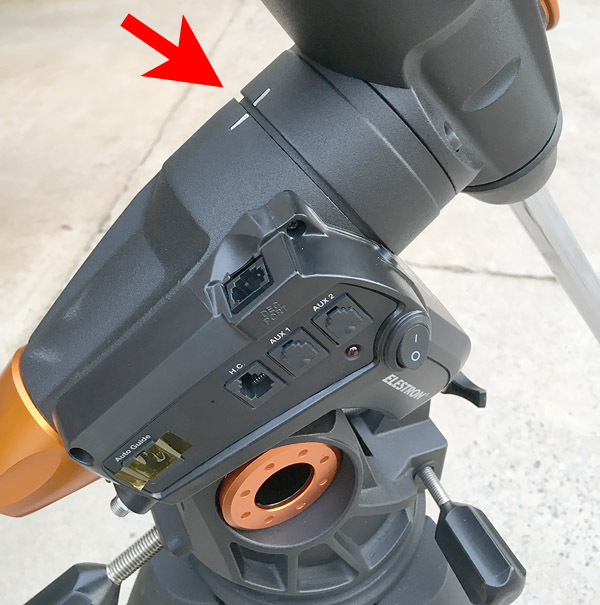
My Celestron AVX telescope mount has taken a trip to California and has come back
suntanned and... well, I mean, has come back a bit steadier and stronger.
And it has a small gap between the index marks that wasn't there before
(see the arrow in the picture). And that's a good thing.
I had the right ascension bearing upgraded by
Orange County Telescope
(see also this announcement),
a service that included some other adjustments.
Why did it need upgrading? Well, a while back, a blogger named RocketSparrow posted
this description of how he improved the RA axis of an AVX.
(That's the axis that constantly turns as the mount tracks the earth's rotation.)
Also, I, among others, noted how to
keep the declination axis from being too tight.
Unlike the bearing on a wheel, the bearing on an RA axis has to bear a load at an angle, neither perpendicular
nor parallel to the axis itself; it's at an angle equal to your latitude, 34 degrees in my case.
The upper (main) bearing on the AVX, as RocketSparrow discovered, is a conventional ball bearing (designed for a
perpendicular load) pressed against a plastic washer (to take up the part of the force that isn't perpendicular).
The inner and outer rings of the ball bearing press against the same plastic washer, which interferes with rotation.
That's why the RA axis of an AVX is so much stiffer than other mounts, and why it's so hard to balance. It doesn't turn freely.
Bear in mind that the AVX is an economy-priced mount, a lot for the money. So it's not unreasonable to find that
Celestron economized on some aspects of the design.
But we can improve this one.
The solution is to put in a tapered roller bearing (angle bearing), designed to carry a load with both
parallel and perpendicular components.
That's what Orange County Telescope did, along with adjusting the declination axis and some
other general cleaning, lubrication, and adjustment.
The only visible change in the mount is that the two RA index marks have about a 4-mm gap between them
(see the picture above) because the new bearing is slightly longer. Nothing is open to the air and nothing looks
out of kilter, but that's how you recognize a modified AVX.
The other obvious change is that the mount turns much more easily in RA. It no longer has the mysterious
stiffness. The declination axis is still stiffer than other mounts, but not excessively stiff, because they adjusted it.
So how does it perform? First, a word of caution: My AVX was in better than average condition already,
due to having already been professionally overhauled once, so I wasn't expecting much (except an easier-to-turn RA axis,
which probably translates into greater load capacity).
And another word of caution. We've been having wretched weather, and there have been only two clear nights since I got it back,
only one of which was clear enough for photography. And the air was unsteady, making it hard to train the PEC and test the
guiding.
Nonetheless, it is better. Most obviously, the motor has an easier time when carrying a heavy telescope such as my C8;
it sounds quieter when slewing. (The declination axis, unmodified, isn't quieter; make sure you listen to them one at
a time.)
How well does it track? Well, although I haven't finished training the periodic-error correction (PEC), my first attempt
(averaged over several worm cycles) shows markedly less periodic error than before the modification.
I am attributing this to adjustment and lubrication of the worm gears, since the bearing shouldn't affect it much,
although surely anything that lightens the load on the motor can't hurt. Here are my PEC training graphs:
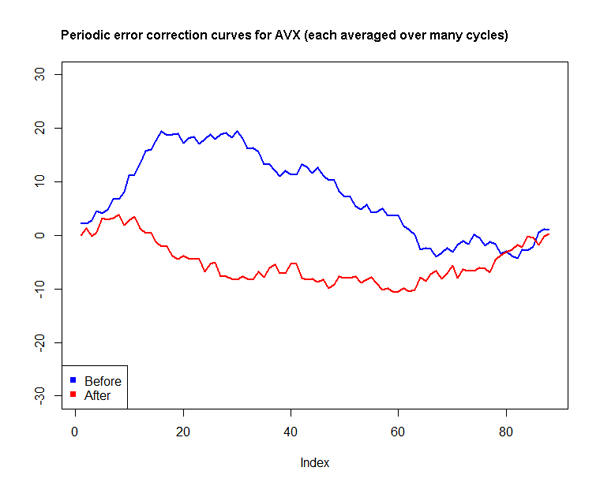
Before the upgrade, I regularly
used this mount with an AT65EDQ telescope (6.5-cm aperture, 422 mm focal length) and DSLR camera, taking individual
exposures ("subs") of 1 minute each with PEC but no guiding corrections. The "yield" (percentage of well-tracked images)
was about 80%.
So how did it do after the upgrade? Bear in mind that my PEC training isn't definitive; I can do better in steady air.
But I do have it trained reasonably well. And on my first attempt, with the same telescope, I was able to take 2-minute
subs, 100% of which were good. Here's what I got, a stack of ten 2-minute exposures of the Orion Nebula.
The second picture is a portion of the full-size original image, so that you can see the accuracy.

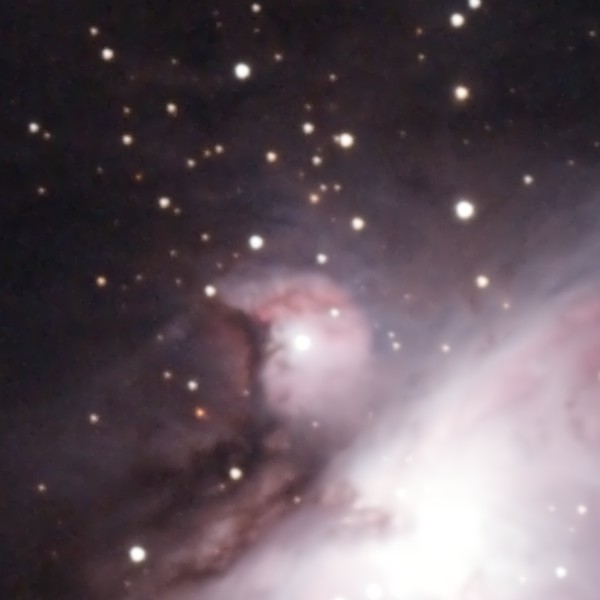
Not bad, is it? But I can't guarantee that it's going to be that good all the time.
I went over to M65, M66, and NGC 3628, a group of galaxies in Leo, and didn't do so well.
My images had some north-south movement as well as east-west, so I can't exactly blame the AVX;
maybe something was loose or a cable was dragging, and the problem may even have been wind;
it had been windy earlier, and I was not outside with the telescope during the whole series
of exposures. The best I could do there was 1.5-minute subs
with a yield of 80%. Even that was 50% better than before the upgrade. Here's a stack
of eight out of ten 90-second (1.5-minute) exposures:
Bear in mind that this was just a guiding test and is in other respects not my best work.
One key point: "I used to do 1-minute subs and now do 2-minute subs" is not a very scientific report.
The length of exposures that you can get away with depends on your camera and telescope, whether you
downsample your images, and the hour-by-hour state of your mount and telescope.
Nonetheless, it is exactly the result I got.
I recommend the upgrade service. Orange County Telescope sells the upgrade as an add-on enhancement
when you're purchasing an AVX from them, but you can also send in your own mount to be upgraded.
In the latter case I recommend contacting them and discussing the condition of your mount,
whether you have any problems with it, and exactly what work is going to be done.
This service is new on the market, and I hope a lot of people find it useful.
I should add that this is not the same service as the
"hypertuning"
offered by Deep Space Products, which keeps the original bearing but makes numerous other
minor mechanical improvements.
Of the two upgrades, I think actually replacing the bearing is more important,
as well as less expensive. My understanding is that you can do both to
the same mount, though I haven't tried it.
Disclaimer: This service was provided to me at reduced cost for review.
Permanent link to this entry
|
2019
February
19
|
Python 2 and 3 on the same Windows PC
[Updated.]
One of my clients uses Python 2, and the other uses Python 3.
More generally, many of us prefer to program in Python 3 but
frequently want to use programs written by others in Python 2.
What to do?
In Linux and other UNIX-like environments, it's easy.
Begin each program with either
#!/usr/bin/env python3
or
#!/usr/bin/env python2
to control which you get. You are actually telling Linux what interpreter
to use. The env command means "find the following command
(python3 or python2)
on the path and run it."
Note that for full UNIX/Linux compatibility, there must not be a space
after python3 or python2, and the file must have
UNIX-type end-of-line marks (available, but not the default, in Windows
text editors).
There's a way to make all that work in Windows, too.
(In fact, #! python3 is sufficient there.) Do this:
- Uninstall any Pythons that are currently on your computer.
- Install Python 2 (from python.org).
Optionally tell it to put Python 2 on the path (which will mean that
the command python on the command line will give you Python 2,
as it does in Linux).
- Install Python 3 (with Python Launcher, which comes with it).
- Go into Control Panel, System, Advanced System Settings, Environment Variables,
and create a system (not user) environment variable named PY_PYTHON
whose value is 2.
- Also make sure there is not a system environment variable named
PYTHONHOME. If there is, delete it.
The PY_PYTHON step specifies that if a Python program doesn't say which Python to use,
it will get Python 2. That's appropriate for older programs that are still being
used. If you don't do the last step, the default will be Python 3.
One more thing:
- The first time you click on a .py file, tell Windows to open it
with Python (if prompted; some installations will not need this).
From then on, all .py files will open with whichever
version of Python is specified in their first line.
Permanent link to this entry
|
2019
February
15
|
Parametric equations of a heart
On Valentine's Day I presented Melody with this R code:
t = seq(0,2*pi,0.01)
x = 16*sin(t)^3
y = 13*cos(t) - 5*cos(2*t) - 2*cos(3*t) - cos(4*t)
plot(x, y, type="l", lwd=3, col="red")
and its output:
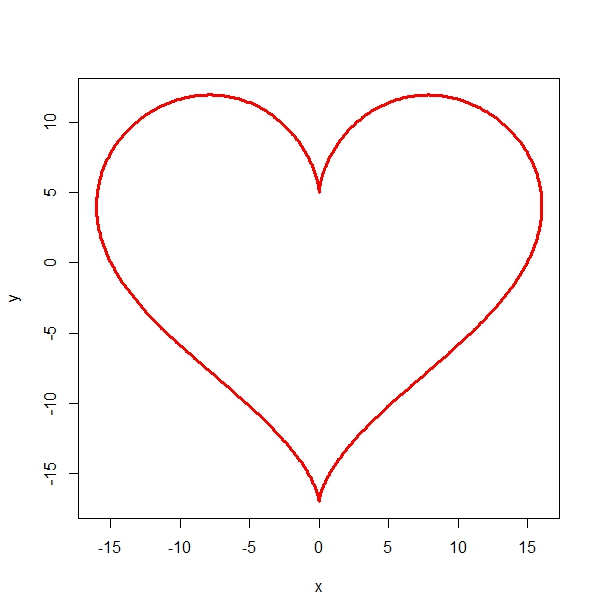
I didn't make up the equations myself; they were circulated on the Internet
with no author indicated.
Permanent link to this entry
|
2019
February
14
|
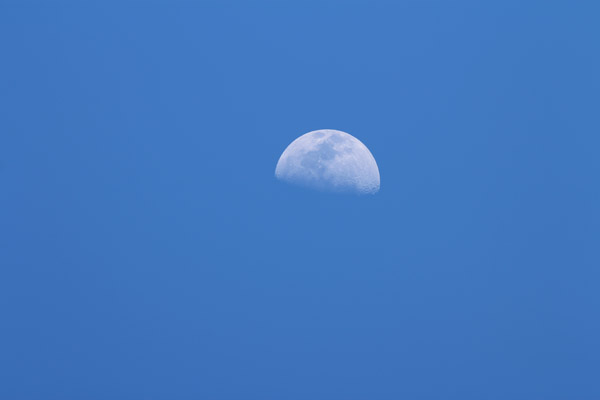
So how did this happen?
Unevenness with Canon Live View Silent Shooting
Yesterday, we finally had a clear evening, and I set up my AVX mount, AT65EDQ refractor,
and Canon 60Da in
daylight to be ready for the evening's work. I saw the moon rising and snapped a picture of
the moon in daylight. And it came out like this:
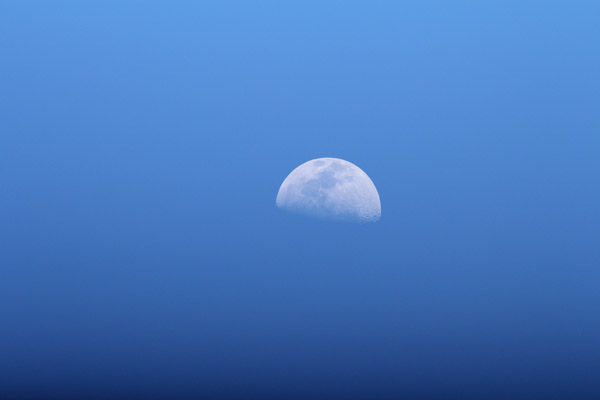
Where did that gradient come from? The sky wasn't darker at the bottom of the field
than at the top, as far as I could see. I quickly took the camera off the telescope and
looked for something blocking part of the light. No luck; no sign of anything amiss.
Unevenness caused by the telescope itself would be round and symmetrical around the center.
The other spooky thing I noticed was that I didn't see the gradient when previewing the
picture in Live View, only when playing back the picture actually taken.
But there it was. I got the same result when I tried it again.
To prevent vibration, I was using
Live View Silent Shooting, which is Canon's name
for electronic first-curtain shutter.
That is, the exposure begins electronically and ends with the closure
of a mechanical shutter curtain.
That way, there is no vibration at the beginning of the exposure.
And my exposure happened to be 1/2500 second at f/6.5, ISO 800. That's a much shorter
exposure than I normally use in astrophotography, even photographing the moon.
The alert reader may surmise what's going on. I turned the ISO down to 100 and the
shutter speed to 1/320. Then I got a normal-looking picture like this:
Another clue is that the X sync speed (for flash) with this camera is 1/250 second.
That's the fastest speed at which the whole shutter is open at once.
At the speed I was using, 1/2500, the shutter uses both curtains at once to form a
narrow slit that moves across the sensor. Each point on the sensor gets a 1/2500-second
exposure, but not all at the same time.
And that's the explanation. The electronic activation of the shutter can't quite match
the movement of the first mechanical curtain, though it does try to emulate it.
Lesson learned: Electronic first-curtain shutter is probably uneven at any speed higher
than the X sync speed of the camera, although in my case, 1/320 was close enough
to 1/250 that I didn't have a problem.
I also made tests without Live View, letting both mechanical curtains do their job,
and the exposure was much more even, though I did find low-level unevenness at 1/1000
and faster.
And now you know.
Permanent link to this entry
|
2019
February
9
|
A voluntary code of ethics for faculty members
Back in the mid-1990s, a group of professors at Clemson got together and suggested
that faculty members sign the following code of ethics and post it on their doors
or include it in their syllabi given out to students. Recently I met one of them,
Dr. Bill Fisk,
learned about their project, and felt it was worth knowing about.
Statement of Ethics and Morals
I herewith commit myself solemnly, freely, and upon my honor, to the following conduct:
1. I pledge that I will perform my assigned responsibilities, and I will respect the position of those placed in authority over or under me.
2. I pledge that through example and instruction I will honor the life, well-being, and good reputation of myself and others.
3. I pledge that by establishing and maintaining professional conduct, I will respect all students and avoid behavior that is intentionally offensive, intimidating, or detrimental to their welfare.
4. I pledge that I will honor and protect the physical and intellectual property of my employer, my fellow scholars, and my students, and that I will not misuse my position or other opportunities to take, without authorization, from others for my own benefit.
5. I pledge that I will speak the truth in so far as the truth is known, and when the truth is not known altogether, then I pledge to seek it out.
6. I pledge that I will uphold the dignity of each individual regardless of his or her origin, convictions, abilities, level of achievement, recognition, or status. I will celebrate the talents and achievements of others and encourage unity in diversity.
(name and signature)
|
(I have done some minor, standard editing of the version that was given to me,
including removing what looked like an accidental duplication of the phrase "through example and instruction."
In modern times, in item 3 we might change "students" to "students and all others with whom I work,"
and we might add "other personal characteristics" to the non-discrimination criteria in item 6.)
Although created by a group of Christians and based on some of the Ten Commandments, this code does not contain,
as far as I can see, anything that non-Christians are likely to disagree with.
What does it accomplish? For one thing, it sends a message to students that we are living in the adult world of
accountability and responsibility, not the childish amoral world that some people think they are in as soon as
they get out from under their parents' wings. To more mature students it gives specific guidance about ethical
responsibilities. And it makes the professor accountable to the students, not just the other way around.
Duties aren't just for subordinates.
Crucially, it's voluntary, adopted by the person bound by it, not imposed by an institution;
but it expresses duties we would have even if we didn't sign a code of ethics.
Permanent link to this entry
|
2019
February
8
|
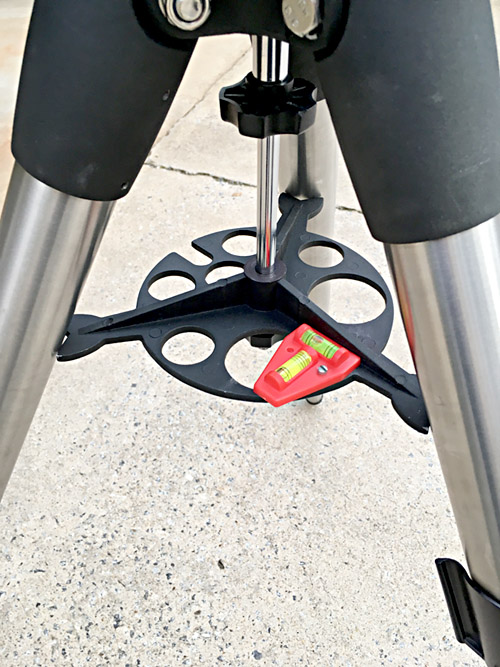
AVX owners: Install your tripod spreader upside down
For years I wished that the knob below the spreader of my Celestron AVX
tripod wouldn't come off when I loosened it a bit.
I wanted to turn the spreader around, without removing it, so the legs could
come closer together for storage.
That was tricky.
The knob was so close to the end of its threads that it often came off.
Today I saw the solution. Just put the spreader on upside down!
That gains about 2 cm of threaded shaft. The spreader is a little less
serviceable as an eyepiece holder, but that's OK because I don't put eyepieces on it.
As you can see in the picture, I've added a bubble level from the hardware store.
Note: I have been advised that this reduces the amount of strength added
by the ribs; don't overtighten the spreader. Cast metal is much stronger against
compression than against expansion. Since the same spreader is also used on
heavier mounts, I'm not too worried. Note that it is not supporting the weight of
the telescope, and nothing will collapse if it breaks. It needs strength only
to resist bending if you overtighten it.
Permanent link to this entry
|
2019
February
7
|
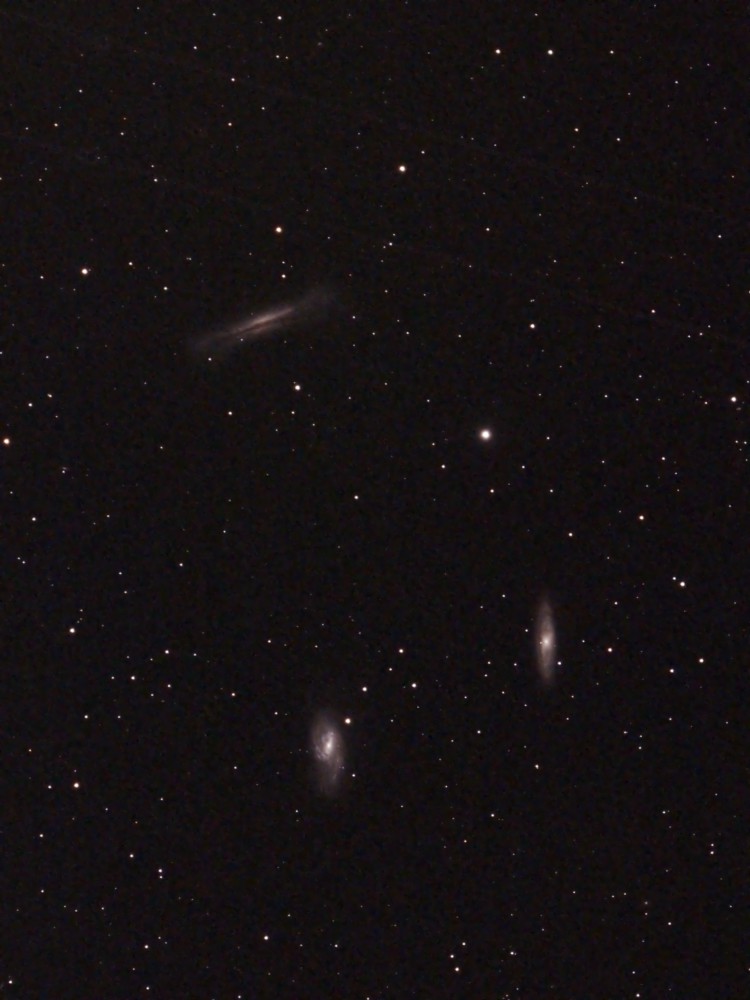
Orion Nebula
On the nights of January 31 and February 1, I took some pictures with my AT65EDQ refractor,
Canon 60Da, and CGEM mount, mainly to gather data for the quantitative analysis
I presented the other day.
I photograph the Orion Nebula (M42) every year, so let's start with that.
Here's a stack of twelve 1-minute exposures at ISO 800.
Some HDR processing was applied in PixInsight.
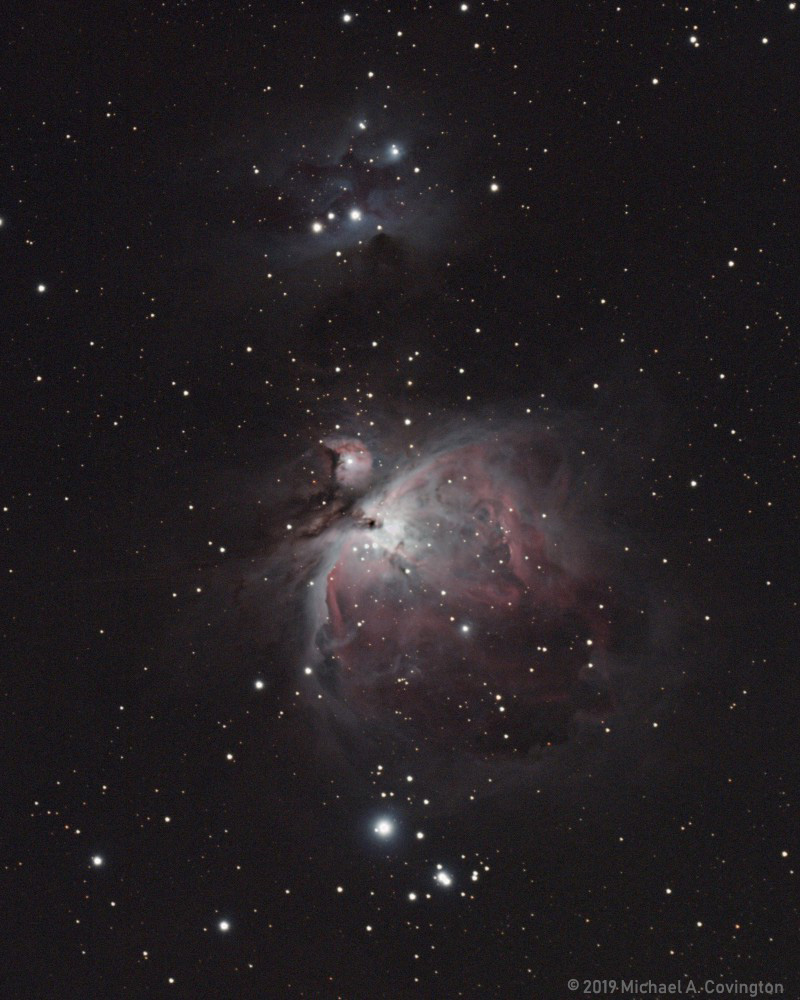
Permanent link to this entry
M47
I haven't photographed the star cluster M47 very many times.
Here's a stack of 13 1-minute exposures with the same setup as above.
Several other star clusters are in the field; I invite you to use
a star map and identify them.
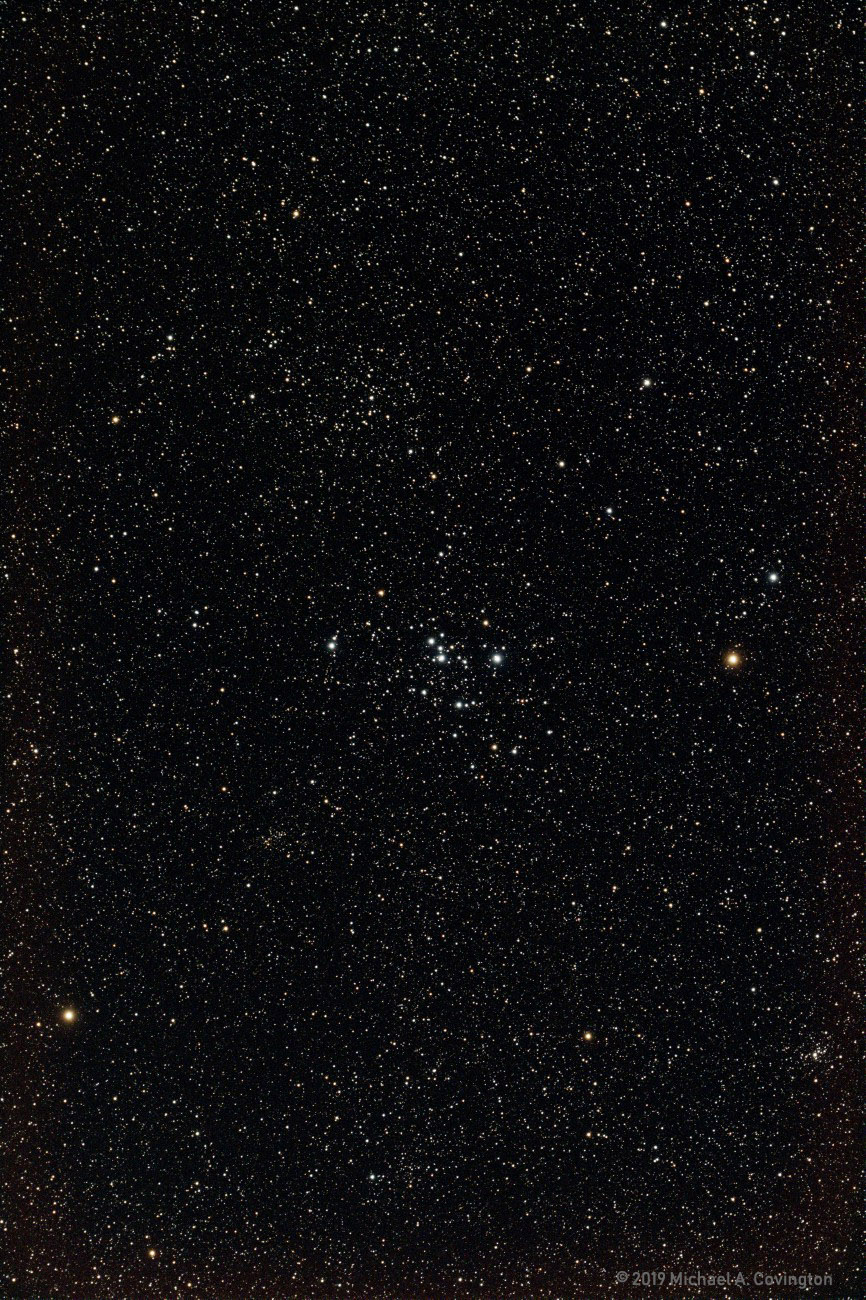
Permanent link to this entry
Pleiades
Finally, here's another picture of the Pleiades; taken in town with short
exposures, it shows only the brightest parts of the dust clouds that envelop
the cluster. Stack of ten 1-minute exposures.
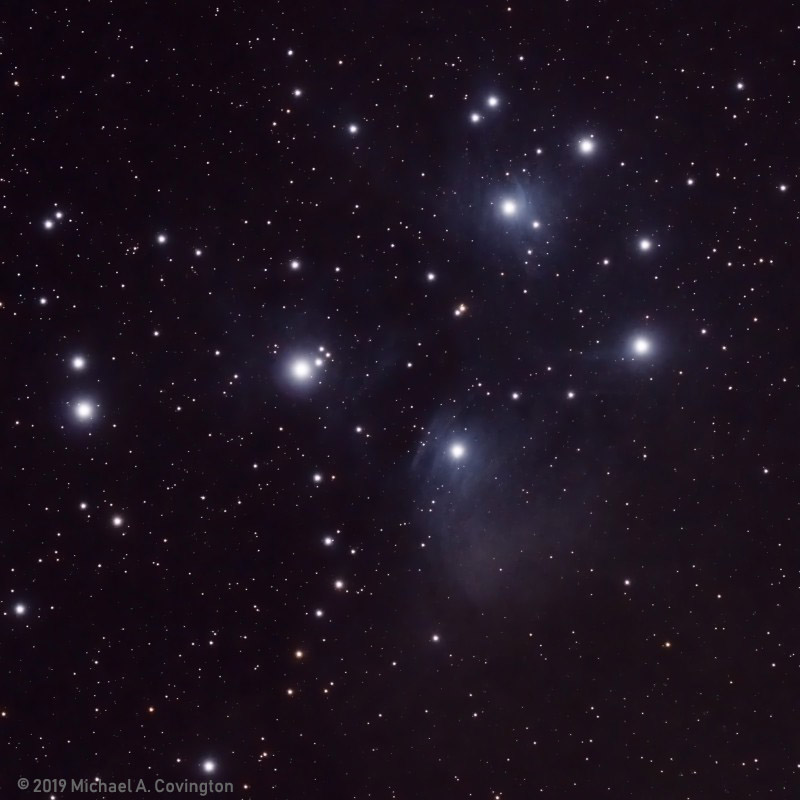
Permanent link to this entry
Code signing goes away from Covington Innovations
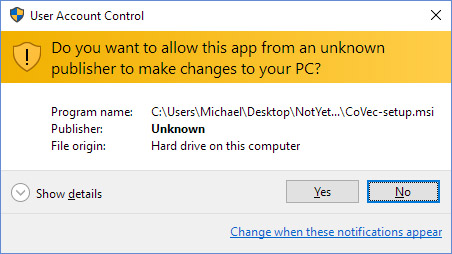
After April, I will again be "an unknown publisher" as far as Windows software
installation is concerned. Three years ago, I told you how
I had acquired a code-signing certificate
so that people installing my software would be told that it was
trustworthy.
Well, the price went up from $200 a year to $500 a year, and I'm balking at it.
In the meantime, code signing has not become universal; several quite reliable
pieces of scientific software are unsigned. And my plan to produce
a line of software products has not gone as far as I
thought it might.
Part of the problem is that signing is starting to be the solution to the wrong problem.
It proves that, regardless of where you got it, what you have is what I issued.
Well, if you get it directly from me, that is not an issue. What I really need
to authenticate is my web site, and that is not expensive. That will prove that when
you go to my site, you're not looking at a copy of it made by someone else with fake
contents inserted. HTTPS (SSL) authentication of my web site is coming, when I get
around to it.
I shall explore whether a self-issued certificate is any use at all, and if so, I might
use one. But I suspect that for signing software, it isn't.
Permanent link to this entry
|
2019
February
2
|
A better way to use a polar scope
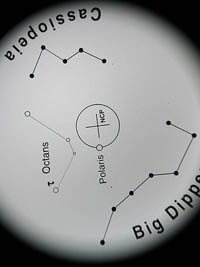 An equatorial telescope mount has to be lined up with the earth's axis, and many
of us do that, at least initially, by sighting on Polaris through a small finderscope
that is parallel with the axis of the mount, called a polar scope.
I've just discovered a much more accurate way to use one.
An equatorial telescope mount has to be lined up with the earth's axis, and many
of us do that, at least initially, by sighting on Polaris through a small finderscope
that is parallel with the axis of the mount, called a polar scope.
I've just discovered a much more accurate way to use one.
Because Polaris is not exactly on the north celestial pole, the reticle in the polar
scope has not only a cross in the center, but also
a circle showing how far off center to put Polaris.
The distance is constant, but the direction varies as the earth rotates and
revolves around the sun.
So the question is where on the circle to put Polaris.
You can find out the direction, at any given moment, from
software such as Polar Scope Align Pro
or iOptron's free app
(or several apps for Android),
or from a chart
that you turn to line up with the constellations
in the northern sky, or even from
pictures of the constellations on the reticle itself, which you match up with the sky by twirling the mount.
I must emphasize that all these apps and charts apply to any inverting polar scope,
as long as it has a circle for Polaris. It doesn't matter whether the circle is decorated with
numbers, constellation diagrams, or anything else.
Computerized mounts then check their polar alignment on the stars and tell you how well you did.
And I wasn't doing too well. I shouldn't have been getting errors of a third of a degree, but I was.
A couple of months ago I had an insight:
It's very hard to judge direction in the reticle because I'm always looking at it
with my head tilted.
I realized that by using the altitude or azimuth knobs on the telescope, I could move
directly up, down, left, or right, and thus ascertain true vertical and horizontal
even though my head was tilted.
Last night (Feb. 1) I had another insight. Instead of putting Polaris in place by a
random mix of horizontal and vertical movements, I should
estimate how far it needs to move horizontally (as a fraction of the
radius of the circle), move there, and then move vertically to put it
on the circle, like this:
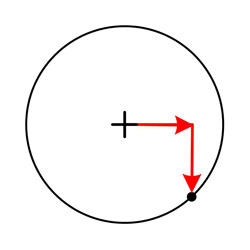
In this example, I looked at my software or chart, estimated that Polaris needed to
be almost 3/4 of the way from center to edge horizontally,
put it there, and then moved vertically to
put it on the circle in the marked position.
It would be handy if the software (not the reticle itself, just the software) had a grid,
like this, to help us estimate how far to move Polaris:
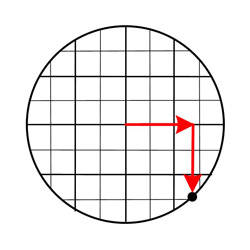
I've suggested that one major software package should display it this way,
and we'll see if that happens.
The reticle itself rotates (at least on Celestron mounts), more or less not under
our control, so the grid should not be printed on it.
Permanent link to this entry
Measuring the tracking performance of two mounts
Many of you know that I often use various small telescopes and telephoto lenses to make
1-minute exposures without guiding corrections, on either a Celestron AVX or a Celestron
CGEM mount, each with PEC (periodic-error correction).
Do the two track the stars equally well? I know they're not perfect without an autoguider,
but they're not bad.
And the other day I realized I had the wherewithal to make a good comparison. Recently I've
taken a good many 1-minute exposures (multiple exposures of several objects) with the same camera
and telescope (Canon 60Da, AT65EDQ refractor) on each mount.
So I analyzed the images with PixInsight's new SubframeSelector tool (just revised in the
latest edition) and scatterplotted FWHM versus eccentricity. FWHM is the diameter of the star
images in pixels, usually a bit less than 3 with this camera. Eccentricity is a measure of
non-roundness. Because the star images are only a few pixels in diameter, they always a bit
out of round, randomly; they don't hit pixels straight-on. So I get an average eccentricity
of 0.5 on even the best-tracked images. Up to 0.6 or 0.65, the star images look fine; values
higher than that indicate poor tracking.
I exported the SubframeSelector results as CSV files and made scatterplots with R (the statistical
software package). Here's one:
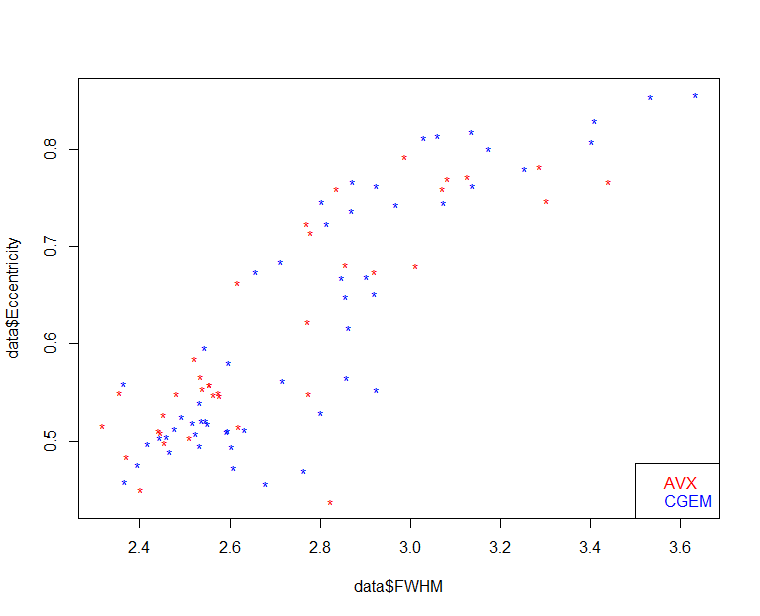
It looks to me like both mounts are equally good. But the plot thickens because:
-
The AVX is now off at Orange County Telescope getting its RA bearing
upgraded.
-
The PEC of the AVX was trained with PEMPRO software, but that of the CGEM was trained by just averaging
several autoguiding cycles. PEMPRO is better. I can probably improve the CGEM by retraining it.
So there's more to come!
Permanent link to this entry
|