The Bausch & Lomb and Leica StereoZoom 4:
Some Technical Notes
2007
Michael A. Covington
Author, Digital SLR Astrophotography


Overview
Unlike a binocular microscope, which feeds one image to both eyes, a stereo microscope
gives each eye its own view, so that you see in three dimensions. Stereo microscopes
are often used for dissection (hence the alternative term "dissecting microscope," not
always stereo), inspecting electronic and machine shop work, and handling specimens to
prepare slides for more powerful microscopes.
One of the most popular stereo microscopes of all time is
the Bausch & Lomb StereoZoom 4 (SZ4),
later taken over by Leica and also marketed under the Cambridge Instruments name.
It was introduced in 1959
and made until 2000.
The StereoZoom 4 gives an erect image, provides an ample working distance, and incorporates
a zoom system in a self-contained optical "pod" which could be put on many different
bases and mounts. StereoZoom 4's are abundant on eBay and in the rest of the
secondhand market today.
The most common variety of "pod" zooms from 0.7× to 3×, although
1–3× and fixed-power versions exist.
Fig. 1 shows how it attaches to a stand; two clips swing out and you can simply
lift it off.
The eyepieces are normally 10×, non-compensating, with 23.2-mm tubes (the standard
size on older microscopes). The eyepieces originally marketed with this microscope are
an excellent match to it. Inexpensive non-compensating eyepieces from other vendors also
work well.
It is quite possible to improvise a stand if you buy a "pod" by itself.
For low-power examination of hand-held specimens, you don't actually need a focusing
mechanism; just support the "pod" far enough above the table and hold the specimen
underneath it.
You can use a desk lamp for illumination, but Bausch & Lomb and Leica made a special
Nicholas (collimated-beam) illuminator that could be used separately or inserted into a
hole in the back of the "pod" (Fig. 2). There is also a transillumination base for the StereoZoom 4
that accepts that same illuminator as its light source.
The Nicholas illuminator has one quirk: dust on the innermost lens surface, near the bulb,
is projected sharply into the
spot of light. Accordingly, a standard maintenance procedure is to open it up and swab
the dust out.
Photography
Although it is not trinocular, the StereoZoom 4 is easy to use for photography. Any camera
adapter that will fit a standard eyepiece tube is suitable. I prefer to use afocal coupling
(that is, camera lens aimed into eyepiece) with a Nikon Coolpix 800 or 990.
Adjustments
Some of the adjustments of the StereoZoom 4 are not widely known. In what follows I'll
review all the adjustments that can be done without disassembly.
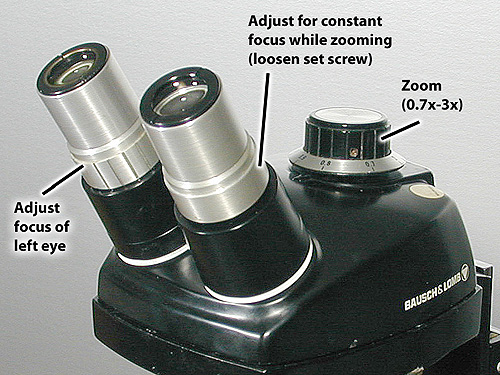
Fig. 3
Eyepiece focusing
There are adjusting rings around both eyepiece barrels (Fig. 3).
The one on the left turns freely and is used to make both eyes focus alike.
The one on the right is secured with a set screw and serves to make the focus
stay the same while zooming. Here is the procedure for adjusting both
of them:
(1) Place a flat specimen, such as a printed page, under the microscope, and zoom to maximum power.
(2) Using only your right eye, focus the microscope. Ignore the image in the left eye.
(3) Loosen the set screw on the right adjusting ring.
(4) Zoom to minimum power and see if the image in your right eye
remains in focus. If not, turn the right adjusting ring
until it does. Repeat this process several times.
(4) Tighten the set screw. Further adjustment of the ring on the right will not be needed unless you
change eyepieces.
(5) Turn the left adjusting ring so that the image in the left eye is also in focus. You can turn
the left adjusting ring at any time without disturbing any other adjustment.
As with most binocular microscopes, you can adjust the separation of the eyepieces at any time
by just pulling them apart or pushing them together.
When doing this, grasp the base of the barrel (painted black,
white, or gray), not the adjusting ring.
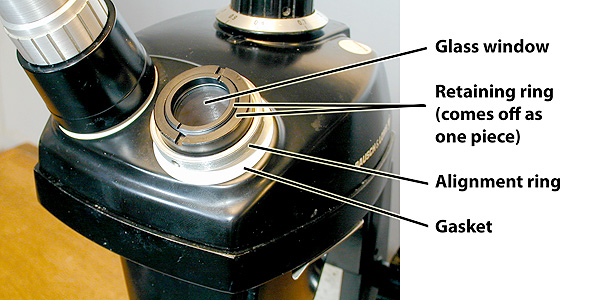
Fig. 4
Alignment (Eyepiece Centering)
Misalignment of the StereoZoom 4 is surprisingly easy to correct.
A stereomicroscope is said to be misaligned when the two eyes are not looking quite in
the same direction.
If minor, the problem may go unnoticed, or you may simply feel that the microscope is
tiring to use, or that no eyepiece separation is quite right.
A StereoZoom 4 that has had its top cover removed will almost certainly be out of
alignment unless it was aligned after reassembly.
To test alignment, put a flat specimen, such as a printed page, under the
microscope and compare the view in the right and left eyes. (If you use a three-dimensional
specimen, the views will certainly be different; that's stereoscopy.)
If your two eyes see the same or almost the same field of view, no adjustment is needed.
But if there's a substantial discrepancy, proceed as follows.
First try to describe the problem: "Image in the right eye needs to move up and to the
left" or the like. This is exactly equivalent to saying, "Image in the left eye needs
to move down and to the right." You can adjust either eyepiece, or both. Naturally, you
will choose to adjust the one that is farthest off center.
Next, grasp the base (painted part) of one or both eyepiece barrels and rotate it anticlockwise
to unscrew it. You'll see the components shown in Fig. 4.
Loosen the retaining ring slightly. Then direct your attention to the alignment ring, which is
held in place by three set screws. Check whether the alignment ring is centered relative to the
retaining ring. If you see an obvious error, correct it and be sure to tighten the set
screws completely before putting the barrel back on.
In general, you will want to move the alignment ring in the same direction that the image in the
eyepiece needs to move. For instance, to move the image to the right, move the alignment ring
to the right. (VERIFY)
It may take a few iterations, but you can achieve correct alignment quickly. Complete perfection
is not required and in fact is not achievable because, in a true stereo microscope, the two eyes
look at the specimen from different vantage points.
Removing the covers
All of this was accomplished without removing the covers on the pod.
If you need to do so, proceed as follows.
The screws that hold the bottom cover in place are obvious; hold the pod upside
down and you'll see them all around its widest portion. Simply remove them, and
the bottom cover comes free. Don't neglect the gasket at the objective end.
With no further disassembly, you can check for dried lubricants on the two rods
that control the zoom mechanism. Some cleaning of these rods and a dab of new
grease will make zooming much smoother.
To remove the top cover, first remove the bottom cover, then the zoom knob
(not neglecting its gasket or padded washer). Then unscrew both eyepiece
barrels; remove the retaining rings, windows, alignment rings, and gaskets;
set the eyepiece separation to the right distance, and the cover will lift off.
To reassemble, reverse these steps and then perform an alignment (described above).
Accessory lenses
Auxiliary lenses were made to multiply the power
of the StereoZoom 4 by 0.5× or 2×, increasing
or reducing the working distance respectively.
They screw into the bottom cover, which is threaded 1.5 × 1/32 inch.
A cell for an auxiliary lens, with no lens in it, has been marketed as a support for
ring illuminators that clamp onto a round body.
Resources
[Updated 2016:]
Parts and accessories for the StereoZoom 4 are still marketed by
Microscope Central.
Manuals for the StereoZoom 4 are on line at
www.science-info.net/docs
(look in both the B&L and Leica folders)
and
http://www.reichertms.com/ref_man.php.
A good review of the history and theory of stereo microscopes is at
http://www.microscopyu.com/articles/stereomicroscopy/stereointro.html.
Michael A. Covington is the author of
Digital SLR Astrophotography and
other books. He spends more time with telescopes than microscopes but
insists that the two are very similar, except for the size of the specimen.
Note to readers: I've told you all I know; I don't have any further information
available about this or any other microscope. Thanks for your interest!
|