|
|
Covington Innovations Home > Astronomy and Astrophotography > Links > Digital SLR Notes > Digital Rebel Astrophotography


Canon EOS 300D/350D/400D/450D (Digital Rebel) Astrophotography
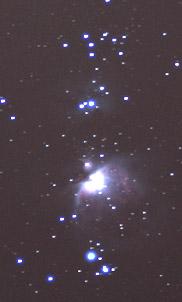
Contents: Introduction - Computer control? - Camera settings - Noise reduction? - Focusing - Taking a Picture - Processing Pictures CAUTION! This page describes my first attempts with DSLR astrophotography back in 2004 and is not up to date. Please see other parts of my web site, and also Jerry Lodriguss's excellent site, for up-to-date information. IntroductionLike many newer digital SLRs, the Canon Digital Rebel (EOS 300D) works surprisingly well as a deep-sky astrocamera without external cooling, particularly when exposures are kept under 15 minutes and dark frames are subtracted carefully.This is a page of brief notes about camera settings, workflow, and practices that I have found most successful.
I assume you have read the camera instruction manual and have taken and processed a few terrestrial pictures with it, and that you are familiar with the basics of piggyback astrophotography (putting your camera on the back of a telescope to track the stars). For basic astrophotography information, see also Canon's DSLR astrophotography site. This page will be more specific than that one.
Advantages of the Digital Rebel
Disadvantages of the Digital Rebel
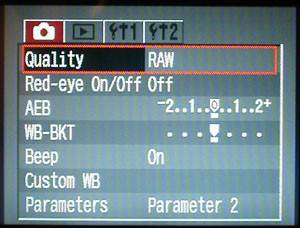
Computer Control?On this page I'll be assuming you do not have a computer with you at the telescope. If you do have one, you can computer-control the Digital Rebel using Canon's Remote Capture utility (included with the camera), Chris Venter's DSLR Focus software, or Steve Barkes' DSLR Control, and run it just like an astronomical CCD camera.An increasing number of advanced astronomy software packages are going to support digital SLRs just the way they support astronomical CCDs. The leader of the pack is presently MaxDSLR, which I recommend. Camera SettingsSettings you will probably set once and leave alone
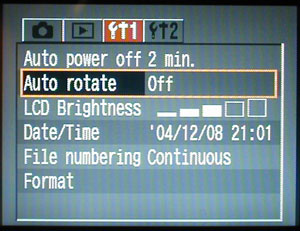
Settings you will make before taking a set of astronomical photographs
Joe Shuster wrote to me suggesting two more (thanks, Joe!):
Noise reduction?The Digital Rebel XT and EOS 20D have optional long-exposure noise reduction, i.e., automatic dark frame subtraction.If this feature is turned on, then every time you take an exposure longer than 1 second, the camera will immediately take a second exposure of the same length with the shutter closed, and subtract it from the first, to eliminate noise from "hot pixels" (points on the sensor that give nonzero readings in the dark). This is a quick way to get good astrophotos. You can do your dark frame subtraction in the camera, without needing a PC at all. The problem is that it's time-consuming. If you want to take three 5-minute exposures, noise reduction will require you to take three 5-minute dark frames as well. If you turn noise reduction off and do your dark frame subtraction on your computer, then one dark frame would serve for all three. Or you could take two or three dark frames, average them to eliminate non-reproducible variation, and then use the combined dark frame, which is more accurate than a single dark frame would be. So in what follows, we'll assume that if you have noise reduction, it's turned off.
FocusingThe Digital Rebel cannot autofocus reliably on the stars. Even if it could, many of the lenses and telescopes that you will be using do not support autofocus.You must focus manually. Unfortunately, the Digital Rebel viewfinder is not designed for manual focusing. It gives a small, dim image. To use it effectively:
Taking a Picture and Dark FrameShortcut: If you don't want to bother with most of the rest of this page, you can get pleasing pictures by just taking exposures in regular JPG mode (not RAW). If there are speckles in the picture, just resample images down to 25% of the original size. Resampling will remove most of the specks from hot pixels.Shortcut #2: If you have a Digital Rebel XT or EOS 20D, use the "noise reduction" option when taking the picture. This will perform dark frame subtraction inside the camera. It will also double the amount of time required for each picture. The normal way to take an astronomical photograph with any kind of electronic camera involves both a time exposure of the subject, and a dark frame taken with the lenscap on, to replicate the hot pixels so they can be subtracted out. Hot pixels are spots on the image sensor that leak electrons, so they act as if they've been exposed to light when they haven't. Hot pixels are more numerous, and hotter, at higher temperatures. You will find that your Digital Rebel works best on cold winter nights. Let the camera get good and cold, but carry a spare battery in your pocket, and put the warm battery into the camera before going to work. The dark frame should be taken under the same conditions as the actual exposures, preferably very soon afterward, and should be the same length. My usual procedure is to take several pictures of different deep-sky objects, all the same duration (e.g., 5 minutes), and then take one dark frame of the same duration. More sophisticated astrophotographers take several dark frames and average them together, to make sure they contain only reproducible artifacts, not random fluctuations. More advanced cameras (Digital Rebel XT, EOS 20D, Nikon D70) will, at your option, perform dark frame subtraction automatically, in the camera. This is handy but can be time consuming if a lot of pictures are to be taken. Processing Pictures on your PCConverting Raw Files to Linear TIFFThe methods described here are obsolete. It is much easier to work with Canon raw (.CRW, .CR2) files with DeepSkyStacker or other astronomy-specific software. To avoid losing any fine detail, don't convert to JPEG yet. Instead, use Canon File Viewer to convert to a 16-bit linear TIFF.By "linear" we mean that the brightness values in the TIFF file will be exactly proportional to those recorded by the sensor in the camera, without any correction for monitor gamma. This is essential so that hot pixels can be subtracted out. (If a pixel has a value of 10 from actual exposure and 100 from hot-pixel leakage, it will read 110. We want to be able to turn it back into 10 by subtracting 100 from it. That will only work if the numbers haven't been monkeyed with.) Then open your file and convert it to a 16-bit TIFF. When you're generating them with Canon File Viewer, only 16-bit TIFFs are linear; the "linear" setting is ignored if you're generating 8-bit TIFFs or JPEGs. Do this to both the picture(s) and the dark frame, making sure exactly the same settings are used. Hint: Canon File Viewer does not use any of the lossless compression that is permitted in TIFF files. These files are going to be big! I recommend ZIPping them if you want to keep them. Or just keep the .CRW files and regenerate the TIFFs as needed.
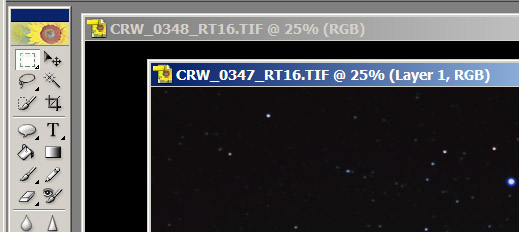
Subtracting the Dark FrameThe methods described here are obsolete. It is much easier to work with Canon raw (.CRW, .CR2) files with DeepSkyStacker or other astronomy-specific software. Now you must subtract the dark frame from the picture. The easiest way to do this is with BlackFrame NR, a free utility that works with both 8- and 16-bit TIFFs and does a beautiful job. (When it's in 16-bit mode, it will sometimes forget to display one of the images, but in my experience, it computes them just fine.) It even includes algorithms to fill in the background color so that an overexposed hot pixel will not punch a black "hole" in the image.If you'd rather do the subtraction with Photoshop or Photoshop Elements, proceed as follows. Open both of the 16-bit TIFFs...
If you're using Elements, it will insist on converting to 8-bit color depth. That's OK, though not ideal. (It's still linear.) The full version of Photoshop will work with the full information content of your 16-bit TIFFs. Don't panic - your picture will look quite dark! If it doesn't contain any overexposed areas, it may look black. To see that there's something in it, do Auto Levels, then undo it. We want to work with the unaltered TIFFs here. Click on the title bar of the dark frame image.
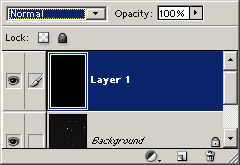
Make sure the Marquee At the top, choose Edit, Copy. Click on the title bar of the picture image. Then, at the top, choose Edit, Paste. Your picture goes black, but again, don't panic! At the top, choose Window, Show Layers, and make sure the Layers subwindow is visible. Set Layer 1 (the dark frame you've just pasted) to Difference (instead of Normal), leaving its opacity at 100%.
Now the dark frame has been subtracted. Last, choose Layers, Flatten Image, and save under a new file name.
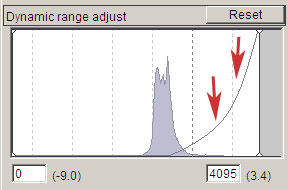
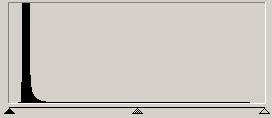
Adjusting LevelsThe next step is to open the picture in Photoshop and choose the Levels adjustment. (If you can't find it in the menus, just hit Ctrl-L.) You'll see a histogram something like this:
This tells you the picture does not span the available brightness range from black to white. Slide the black and white pointers closer to the black part of the histogram, and then move the gray pointer to the left or right to adjust the midtones:
Resampling and SharpeningFinally, decide how big you want your picture to be. Apply the Sharpen filter, then Image Size (with Resample checked), and then (if you made it smaller) Sharpen once more.Images for display on the Web should generally be something like 300×300 to 700×1000 pixels. Images for sharp 5×7 prints can be downsampled to half the Digital Rebel's initial resolution (i.e., 50%, which will make your 2000×3000-pixel image into 1000×1500 pixels and get rid of a good bit of noise and speckles). Copyright 2005, 2006 Michael A. Covington. Caching in search engines is explicitly permitted. Please link to this page rather than reproducing copies of it. This page is not in any way connected with or endorsed by any photographic manufacturer. Many of the product names that appear on this page are registered trademarks of their respective owners. |


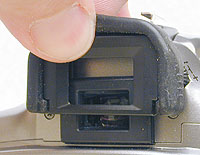
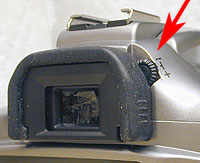 Set the eyepiece diopter
(see picture at right)
so that you can see the focusing screen with perfect clarity.
(Practice this during daylight, preferably in dim light, wearing whatever glasses
you will wear when doing astrophotography.)
Set the eyepiece diopter
(see picture at right)
so that you can see the focusing screen with perfect clarity.
(Practice this during daylight, preferably in dim light, wearing whatever glasses
you will wear when doing astrophotography.)
 tool is selected,
then right-click on the dark frame image itself and choose Select All.
tool is selected,
then right-click on the dark frame image itself and choose Select All.
 →
→