 |
|
Covington Innovations Home > Astronomy and Astrophotography > Links > Digital SLR Notes > Processing with Nebulosity

Processing DSLR Raw Images with
Stark Labs' NebulosityMichael A. Covington
Revised March 25, 2007; minor updates September 1, 2008
Contents:
Preliminaries
How to avoid all this work
The input
Screen stretch
Subtracting dark frames
Converting to color (de-Bayerization, demosaicing)
Stacking images
Stretching and digital development
Saving the result
Preliminaries
These are some hastily written notes about how I process DSLR images of deep-sky objects using Nebulosity, from Stark Labs.
See also this tutorial by Kip Pauls and Bill Logan, which covers equipment control as well as image processing with Nebulosity, and my tutorial on image processing with MaxIm DL and MaxDSLR.
Nebulosity is a low-priced but effective image processing and camera control program somewhat similar in design to MaxDSLR; the two make a good pair. Unlike most other such packages, Nebulosity is available not only for PCs, but also for the Macintosh.
I normally do the final processing of my pictures in Adobe Photoshop. My main goal here is to show you how to calibrate and stack images, then convert them to a format that is easy to handle in Photoshop and similar packages.
I know I'm leaving many things out. At the same time, if you are using this software and you think I'm omitting something vital, I'd be glad to hear from you.
Limitations of Nebulosity 1.4.8:
- These instructions are for Nebulosity 1. They were developed with Nebulosity 1.4 and are basically correct for 1.8. Nebulosity 2 is a more advanced product.
- Canon CR2 is the only DSLR raw file format that can be handled directly in nebulosity 1.4. If using any other type of DSLR, you must convert your files to linear TIFFs before processing them. This can generally be done with the software that came with the camera.
- Nebulosity often doesn't display the "busy cursor" (hourglass or twirler) while it is working, and there may be little indication of what is going on. If something should be happening, just wait.
How to avoid doing all this work
To get the camera to do all this work for you, take one exposure of your deep-sky object (not a set of them) and use the camera with long-exposure noise reduction turned on. (On Nikons, this is an obvious menu setting; on Canons, it is a "custom function," and on the original Digital Rebel, it is a missing feature.)
Then, as soon as you close the shutter, the camera will automatically take a matching dark frame, subtract it, gamma-correct the result, and save it as a JPEG file.
You can still adjust the contrast of your JPEG in Nebulosity and/or Photoshop (or even MaxDSLR) and combine multiple JPEGs of the same object.
The rest of this document assumes you want to do things the hard way. Why? To be able to stack (combine) multiple images with maximum precision, and also to avoid having to spend as much time on dark frames as you do on actual exposures.
The input
I assume you're starting with:
- One or more (identical) exposures of a deep-sky object, taken with the camera set to raw mode with long-exposure noise reduction turned off;
- One or more (identical) dark frames, which are exposures taken with the lenscap on, matching the original exposures in duration and ISO setting, with the camera at the same or a slightly lower temperature.
Screen stretch
Nebulosity will mystify you if you don't know about screen stretch. The key idea is that you view the image with much more contrast than the image actually has. That is, the contrast on the screen is much higher than in the image file, and you see only a portion of the image's brightness range (hence the term "stretch"). Think of it like magnification in the dimension of contrast rather than height or width.
Screen stretch only affects how you view the image, not the image itself. Changes to screen stretch do not affect the image and will not be saved when you save it to disk.
Screen stretch is displayed and controlled at the upper right corner of the screen:
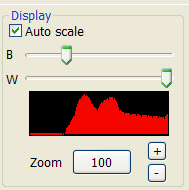
What you are looking at is a histogram of the image. It usually takes the form of a big pileup at the left (consisting of very dark background pixels) and a few much brighter pixels trailing off to the right.
The two sliders should be at the left and right sides of the hump in the histogram. Nebulosity can set them automatically, or you can set them manually.
Subtracting dark frames
Unlike more elaborate packages, Nebulosity normally subtracts only one dark frame from each of your pictures (not the average of several).
(If you have multiple dark frames, you can use Nebulosity to average them manually to make a master dark frame, and then use that. Use Processing, Align and Combine, None (Fixed), and open your dark frames as .CR2 files. Save the result as a FITS file and use it as the dark frame in the next step. You can do the same if you have multiple flat or bias frames.)
In this example we will not use flat fields or bias frames. A flat field is a picture of a uniformly bright object (such as a cloudy sky), used to counteract vignetting and dust. A bias frame is a zero-length exposure and is only needed if the dark frames are going to be scaled (multiplied) because they do not match the exposure time or ISO setting of the actual images. Nebulosity supports these, but they are usually not necessary.
In Nebulosity, actual images of celestial objects are called light frames.
Performing a dark frame subtraction
If you are working with DSLR raw files, choose Processing, Pre-Process B&W/Raw Images. If you're working with images that were already converted to TIFF, choose Pre-Process Color Images.
You'll see this menu:
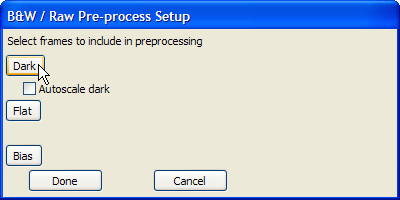
Click Dark and choose the dark frame file.
If the dark frame was not taken at the same ISO setting, exposure duration, and camera temperature as the pictures you want to process, then check Autoscale Dark and Nebulosity will try to correct the mismatch.
Since you are not including any flat or bias frames, next click Done.
Next you'll get a file dialog titled Select Light Frames. Select all the files you want to process and click OK.
The output goes onto a set of files in the same directory as your images. Alongside your original files there will be new new FITS files with names of the form pproc_....fit where the original file name is in the middle. The last of these will also be open on the screen and will look something like this:
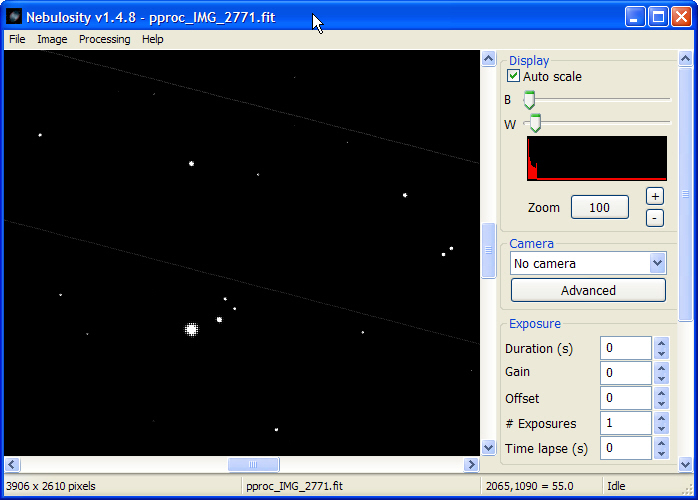
Note the cloth-like texture (the fine grid pattern) of the undecoded Bayer image.
During the processing, there is no hourglass cursor, but the computer's progress is indicated in the status line at the bottom of the window.
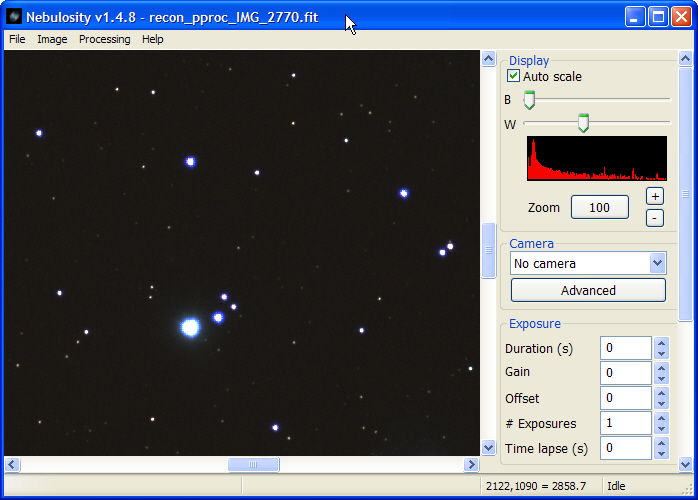
Converting to color (de-Bayerization, demosaicing)
So far you've been looking at black-and-white raw images. Now it's time to interpret the pixels as red, green, or blue, and combine them according to the Bayer algorithm.
If you are working with images already converted to TIFF, skip this step.
Choose Processing, Batch Demosaic and Square Raw Images. ("Demosaic" means to decode the Bayer mosaic pattern; "square" means make the pixels square, which, in the case of a DSLR, they already are. Some CCD cameras have rectangular pixels.)
Choose the pproc_....fit files from the previous step. Click Open.
Nebulosity will work for a while. During much of this time you will not have an hourglass cursor. Look for a status indication such as "On 3/4" (which means "working on the third image of four") at the bottom of the screen.
Again the output goes onto files, this time with recon_ added at the beginning of their names. One of them is left open for viewing on the screen. (In Nebulosity you cannot view more than one file at once.) You should see something like this:
Stacking images
Now it's time to stack (combine) your color images. In Nebulosity, this is simple, and the images are always combined through averaging rather than by taking the median or some other function.
You have to decide what kind of combination you want:
- Translation means shifting (up, down, left, and right) only. This is appropriate if all your images were taken, one right after another, through, or piggybacked on, an equatorially mounted telescope.
- Translation + Rotation means shifting and rotating. This is appropriate if your telescope was tracking in alt-azimuth mode or if you think the camera or lens may have twisted slightly between exposures.
- Translation + Rotation + Scaling means all of that, plus stretching (changing size). This is rarely needed, but it might be appropriate if the image size of your telescope changes when you touch up the focus.
In addition, Nebulosity offers the Drizzle algorithm for combining larger numbers of images without accumulating blur. It is like Translation + Rotation but gives a noticeably sharper result if you are combining eight or more images.
Now then. Choose Processing, Align and Combine Images, and make the appropriate menu choices:

Then select the images you are combining (typically the recon_...fit images from the previous step).
Now you must tell Nebulosity how to line them up. To do this, you'll have to select a star in each image. If rotation is involved, you'll have to select the same two stars in each image, and they should be well apart.
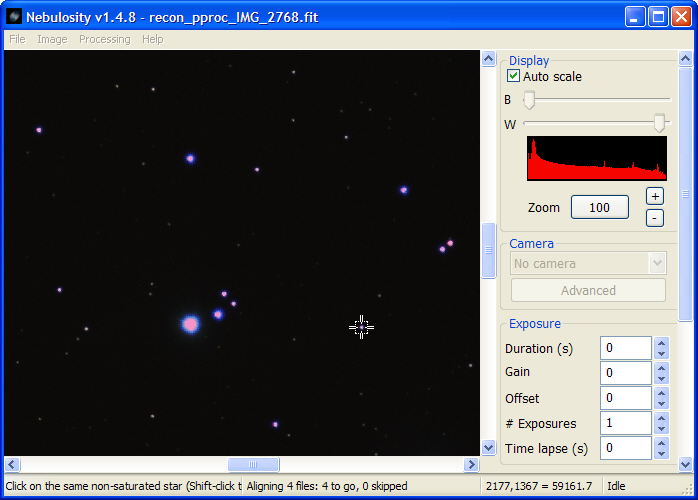
Choose a star that is not excessively bright. Don't worry about hitting the star exactly; your job is to locate it, and then Nebulosity will find its centroid in the image.
Nebulosity works a surprisingly long time after each click; an hourglass cursor is displayed until Nebulosity is ready for the next click.
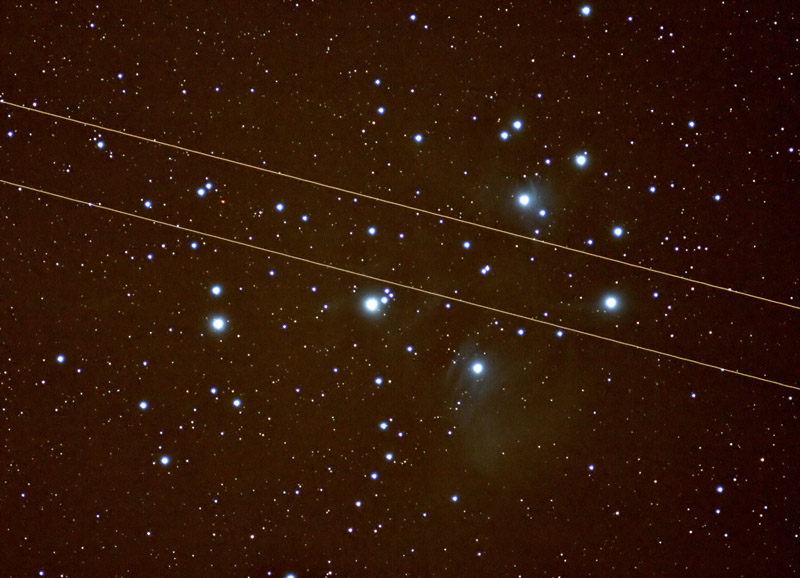
When you've clicked on stars in all the images, the stacking is performed and Nebulosity asks you for a name under which to save the result. The stacked image is also left open on the screen:
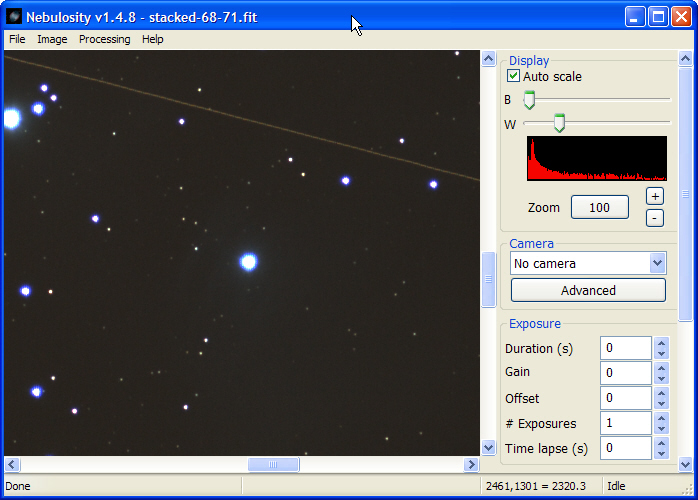
It's an image of the Pleiades with an airplane trail. At this point, if I wanted a good picture, I should go back, identify the picture with the airplane in it, and stack again leaving that one out. But at this point it's equally instructive to just keep going, so that's what I'll do.
Stretching and digital development
Our goal is an image that will be easy to process with Photoshop or similar programs. At this point we still have two problems:
- The midtones are too dark relative to the rest of the image; that is, the image needs gamma correction. For more about why this is so, click here.
- Depending on whether they were stretched earlier, the pixel values may not use the full range (0 to 65,535) of a 16-bit TIFF image.
A quick way to address both of these problems is called digital development. This is a combination of gamma correction and unsharp masking (sharpening). Digital development was invented by Kunihiko Okano, and you can read about it here. It is a rather quick algorithm to do what would otherwise be a multi-step process.
In Nebulosity, the digital development algorithm usually works well with DSLR images. Just go to Image, Digital Development (DDP), and let the algorithm do its work:
Although the defaults are usually reasonable, you can further improve the image by adjusting the sliders; experiment with them.
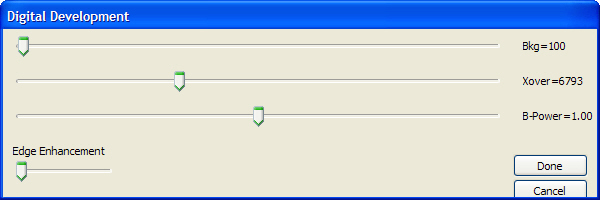
Caution! Due to a bug in Nebulosity 1.4.8, the sliders continue to sense mouse motion after you release the mouse button. This can lead to confusing results. Immediately after moving a slider, do not move the mouse while the hourglass cursor is being displayed.
More stretching
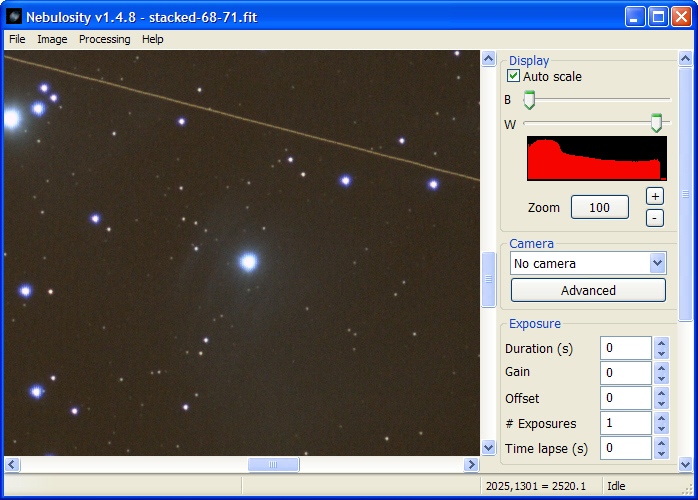
At this point you probably don't quite have a finished image. You can do some more stretching using the "Levels" sliders, which work very much like Levels in Photoshop.
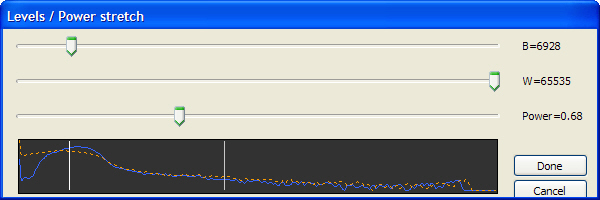
Often, you will want to move the bottom slider appreciably to the left and the top slider slightly to the right. I suggest doing this in several steps, each time making less of a change than you actually think necessary; that gives you more control of the resulting curve shape.
These sliders have the same bug mentioned above.
Saving the result
I normally do final processing with Photoshop, and then reduce grain with Neat Image, so my goal at this point is to save the picture onto a file that Photoshop can process.
The File menu makes this easy. Note that you have different menu choices for different kinds of files; 16-bit compressed TIFF is the best if Photoshop is the destination.
The finished product, after processing with Photoshop and Neat Image, cropping, and resizing, looks like this:
Enjoy! There it is, airplane and all. Next time I revise this page I'll use a picture without an airplane!
Copyright 2006 Michael A. Covington. Caching in search engines is explicitly permitted. Please link to this page rather than reproducing copies of it. This page is not in any way connected with or endorsed by any photographic or software manufacturer. Many of the product names that appeaon this page are registered trademarks of their respective owners.