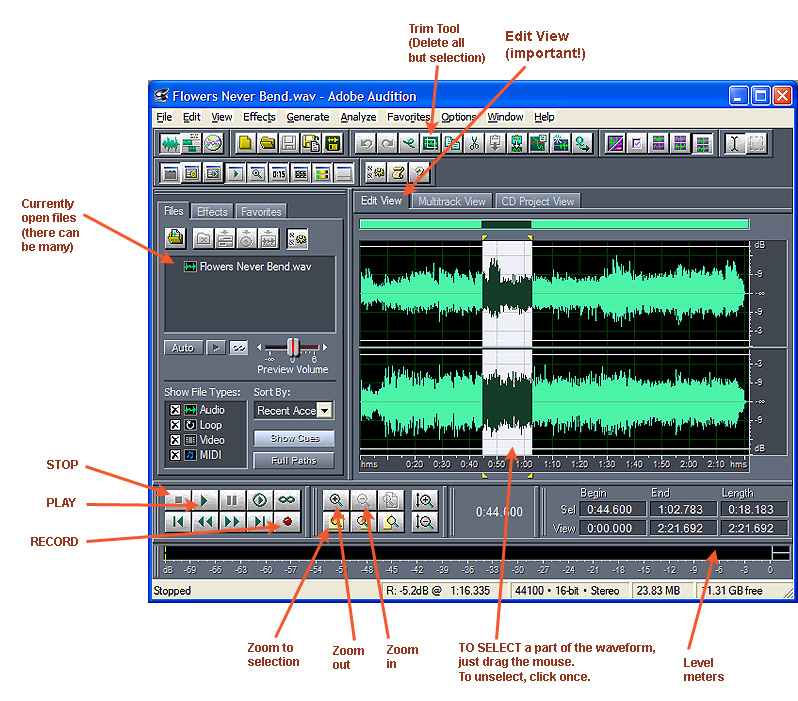
Note that, unlike GoldWave, Audition has everything in one window; there is no control window to get lost.
The Edit View (Waveform View) is what we will use for all the editing described here.
You can select material in the left or right channel or both, depending on whether the
mouse cursor is at the top, bottom, or middle of the waveform area when you drag it to select.
When you play, playback will begin at the cursor if there is one, or the selection will
be played, or if nothing is selected, the whole waveform will be played.
Bit depth (16 or 32)
Standard CD-quality audio files have 44,100 samples per second, 16 bits per sample.
However, many of us now have 24- or 32-bit sound cards and can record 32-bit audio files.
These give higher quality and can be downsampled to 16 bits before burning to CD.
Further, Adobe indicates that highest quality is obtained by upsampling your file
to 32 bits if it was not already recorded at 32 bits,
editing it, and then downsampling again to the original format.
To change the bit depth, use Edit, Convert Sample Type. Do not change the number
of samples per second unless absolutely necessary, since that would raise antialiasing issues
just like resampling a graphic image. However, changing bit depth from 16 to 32 is lossless,
and changing 32 to 16 causes no more loss than necessary.
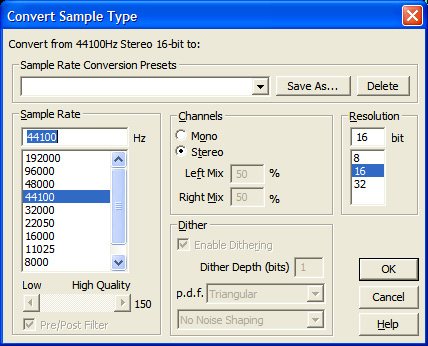
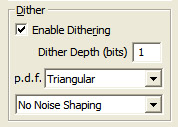
If you are converting to a lower bit depth, the "Dither" section of the menu will
be enabled. The default settings, shown here, are good ones.
Note that one of the things you can do here is convert mono to stereo or vice versa.
After recording a mono record with a stereo cartridge, convert it to mono in order to discard
some noise.
If you want to burn a mono file to CD, consider converting it to stereo and then filtering the
channels differently (more bass on one, more treble on the other) for "fake stereo."
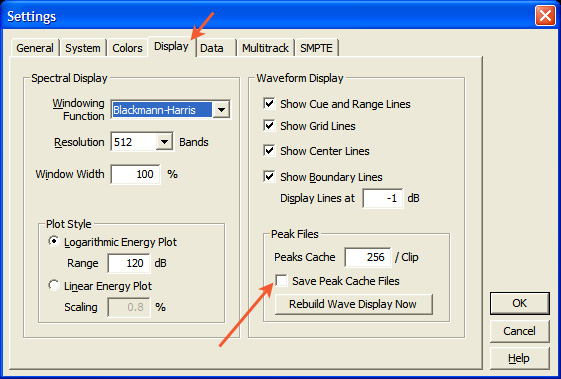
Those .PK files...
You will notice that, by default, Audition leaves files with names ending in .pk all over
your disk, one alongside every audio file that you save.
These contains a pre-generated graphic display of the waveform, to save time when Audition loads
the file again.
They are not necessary and I recommend that you tell Audition not to generate them.
That setting is under Options, Settings, Display; uncheck "Save Peak Cache Files."
Saving non-audio information?
Whenever you save a file with Audition, you'll be asked whether to save "extra non-audio information."
If you're going to use the file in Adobe Premiere for video production, yes.
Otherwise, no. Whatever choice you make will be the default for next time.

Making recordings
Setting the levels
Connect your signal source to the sound card and start the music playing.
Now look at the level indicators at the bottom of the screen.
They're probably all black. If they're not there at all, choose Window, Level Meters.
The level indicators are normally active only when playing
or recording.
To get them to show the input level even though you're not recording it,
choose Options, Monitor Record Levels or hit F10.

The signal level must never reach 0 db or it will clip and sound awful.
The highest peaks should be around -3 to -5 dB.
To actually select the signal source and set the level, choose
Options, Windows Recording Mixer.
This will bring up the Windows Volume Control in recording mode.
Covington Innovations note: The Sound Blaster 24 sometimes needs
to be re-initialized by selecting another input source (such as Microphone) and then
going back to Line In. Until this is done, the levels are way too low.
It is normal to have to set the Line In level near, or at, the top of the scale
when feeding 0.2-volt signals into a Sound Blaster.
For explanations, click
here
and
here.
Recording and saving
Unlike GoldWave, Audition does not require you to specify the length of the recording in advance.
Choose File, New.
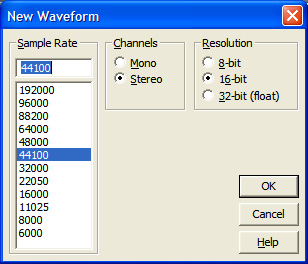
The usual format for CD-quality audio is 44,100 samples per second, 16 bits.
However, if you have a 24- or 32-bit sound card,
or if you plan to edit heavily,
you can get better quality by
choosing 32 bits.
You will eventually downsample the file to 16 bits to make audio CDs.
If you burn your CDs with Audition, this will be done for you.
Always record at 44,100 samples per second (44.1 ks/s, 44.1 kHz).
Some sound cards cannot play files that were sampled faster than that.
Editing with Audition
Workflow suggestion: Save your original, unedited recording as a file with "raw" in its
name. Then save it again without "raw" and continue to work on the latter file.
Second workflow suggestion: You are going to use several filters on nearly every record
that you digitize. I suggest putting them into Audition's "Favorites" menu.
Bit depth again
As noted above, Adobe recommends working with 32-bit files when
using filters. A 16-bit file can be upsampled to 32 bits with no loss provided you do not
change the number of samples per second.
I have not actually found this necessary, but in critical cases it may be helpful.
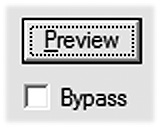
Concept: Filter, Preview, Bypass
Most filters for Audition provide a Preview button so you can play the sound
with the filter applied, without affecting the actual file that you're editing.
The preview will play over and over. If you are previewing a small selection,
this can be disconcerting at first.
While previewing, you can change filter settings and listen to the effect of the changes.
By checking Bypass, you can temporarily disable the filter during the preview;
this gives a quick way to switch the filter in and out of the system.
Then click OK to actually apply the filter after previewing it.
All filters apply only to the selected portion of the wave.
| Workflow note: It may be more convenient to
chop the recording up into songs at this stage,
before doing any other work, so you
can work on the songs separately. If you do this, use "Save Selection" and save more
than just the song you've picked out; include the whole inter-song gaps and
small amounts of the adjacent songs. That way, you can get good noise samples. |
Removing pops, clicks, and crackle
You should always remove pops and crackles before applying any other kind of filter.
Other filters will blunt the pops and crackles so they are not recognizable.
So does MP3 compression; at this stage you should always be working with a lossless file
(WAV or the like).
There are 4 ways to remove pops and crackles with Audition:
- Repair Transient
- Auto Click/Pop Eliminator
- Click/Pop Eliminator
- ClickFix plugin (a separate third-party product)
This document will cover only the first three.
ClickFix is highly recommended by its users, but I have not tried it;
the consensus is that the quality of results is equal to those obtained with
the filters already built in, but the processing goes much faster.
Repair Transient (Fill Single Click)
This is a way to repair a single loud click. It is on the Favorites menu and is actually a shortcut
to the "Fill Single Click Now" option in the full Click/Pop Eliminator.
Select a small portion of the waveform containing the click.
(Be sure to select as small a portion as possible because Repair Transient is likely to
attenuate the whole selected portion as well as taking out the pop.)
Choose Favorites, Repair Transient.
Watch and listen to the magic.
Note that you don't need to select both channels if only one channel contains the click.
To select only one channel, put the mouse cursor near the top or bottom edge of the waveform area
while dragging it.
Auto Click/Pop Eliminator
This is a software tool that scans the file, or the selected portion, for clicks and pops like those
that come from scratches or static on vinyl records, and then eliminates them.
Use this tool only when needed. Used properly, it can work miracles.
But it can also cost you some musical fidelity, especially when overused.
It is not always possible to distinguish music from extraneous clicks or crackles.
Remember that musicians make occasional clicking noises when handling their instruments.
Not every tiny click or thump is a defect in the recording.
Select the entire waveform or the portion you want to filter.
Choose Effects, Noise Reduction, Auto Click/Pop Eliminator.
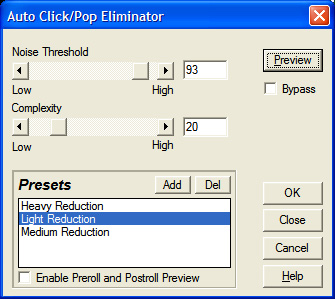
Press Preview and try various settings. ("Light Reduction" will remove the loudest pops
and can safely be used routinely on a recording that appears to be clean;
you may need "Heavy Reduction" for a crackly recording.)
Check Bypass to temporarily turn off
the filter so you can hear the difference moment by moment.
When satisfied, press OK and the filter will be applied to the whole selection.
Regular (not Auto) Click/Pop Eliminator
This is an older component with which I am not fully familiar.
It is documented on
Adobe's site
and in the User Guide.
There is no Preview button for this filter.
To find out what it will do, I suggest selecting a small portion of your recording,
trying the filter, playing the selected part, and then using Edit, Undo.
My experience is that this Click/Pop Eliminator is a lot more aggressive than the Auto one.
In particular, it tends to be hostile to trombones – that is, it tends to distort
trombone music because it mistakes the sharp brassy sound waves for noise.
Note that several sets of settings are predefined for you, and you can define your own and
save them.
Here is one that I've defined for myself. It is a "cautious decrackler" that removes crackle
and most pops but does not eat trombones:
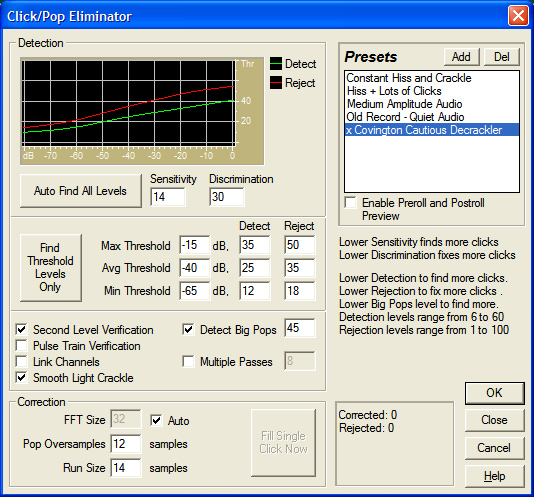
To put this one on your own menu, first copy all the numbers into the appropriate
places, then click "Add" at the upper right, and supply a name.
I named mine "x Covington Cautious Decrackler" so that it would appear at the
end of the alphabetical list.
Removing subsonic rumble
Recordings from vinyl records often contain rumble at frequencies too low to hear.
Before using the regular Noise Reduction filter, you should consider filtering
out the subsonic rumble, since it degrades the reproduction of audible sounds
and may confuse other filters.
Select the entire file.
Choose Effects, Filters, Scientific Filters.
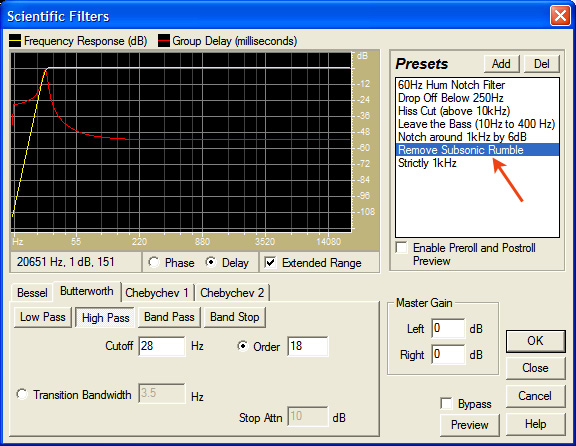
Choose "Remove Subsonic Rumble" and click OK.
Covington Innovations note:
Recordings made with our Audio-Technica turntable often have a significant rumble that looks like a 10-Hz
sine wave (waves 0.1 second apart). I'm going to investigate whether this is a mechanical problem, or maybe
a need for more damping under the turntable, or just an artifact of having unusually good bass response
in the amplifier chain.
Suggestion: Change the corner frequency from 28 to 20 Hz and save the new
filter as Covington Subsonic Rumble. That will reduce its effect on the bass
(if 28 Hz is bass!) while retaining its benefits.
At Covington Innovations, this has been done on Minerva.
There is also a notch filter for 60-Hz hum.
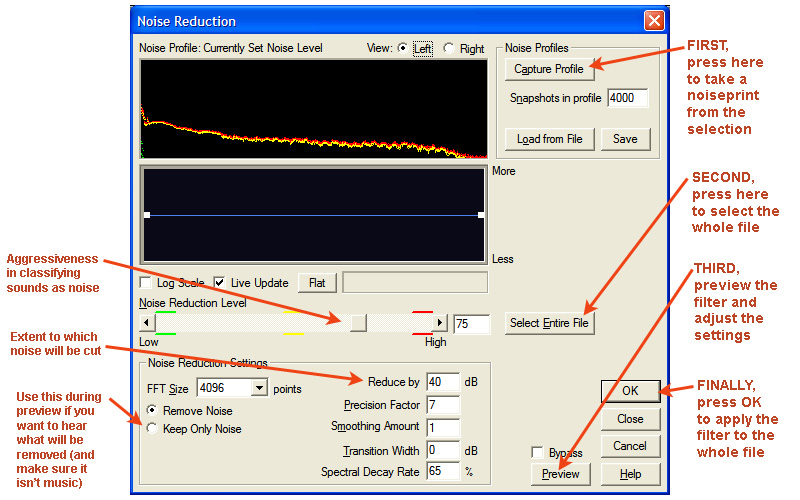
Removing continuous noise
After removing clicks, pops, and rumble, you will probably be left with some surface noise,
hum, and rumble.
If you're restoring a tape, this is where you'll deal with the tape hiss.
The idea behind this filter is to take a sample of a portion of the recording
that should be silent (a "noiseprint"),
determine its spectrum, and subtract that type of noise
everywhere.
Use this filter sparingly. If overused, it can cost you quite a bit of musical
timbre, but it can also work wonders. Lightly used, it does not harm the fidelity
of the recording.
Before opening the filter, select about 2 seconds of the silence between songs
in your recording. Make sure it is typical and doesn't contain music or
unusual pops.
Then open the filter with Effects, Noise Reduction, Noise Reduction.
It looks like this: